> ## Documentation Index
> Fetch the complete documentation index at: https://docs.jinba.io/llms.txt
> Use this file to discover all available pages before exploring further.
# Building a RAG Chat System
> A step-by-step tutorial to build a Retrieval-Augmented Generation chat system using Jinba Flow — from knowledge base setup to deploying a live chat interface
Build a fully functional AI chat system that answers questions using your own documents. This tutorial walks you through every step: creating a knowledge base, building a RAG workflow, and deploying it as a chat interface.
## What You'll Build
A chat system that:
1. Accepts a user question (via chat, API, or AI assistant)
2. Searches your knowledge base for relevant information
3. Uses an AI model to generate an accurate answer grounded in your documents
4. Returns the answer with source references
```mermaid theme={null}
flowchart LR
Q["💬 User Question"] --> S["🔍 Vector Search
Knowledge Base"]
S --> C["📋 Context
Assembly"]
C --> G["🤖 AI Generation
with Context"]
G --> A["✅ Grounded
Answer"]
```
## Prerequisites
* A Jinba Flow account ([Sign up here](https://flow.jinba.io/))
* Documents to upload — PDFs, DOCX, or text files you want your chat to reference
* Basic familiarity with [Jinba Flow concepts](/en/pages/basics/core-concepts) — Flows, Steps, and Tools
No coding experience is required. You can build the entire system using the chat panel or graph editor. The YAML manifests shown below are for reference and can be copied directly.
## Architecture Overview
Before we start building, here's how all the pieces fit together:
```mermaid theme={null}
flowchart TB
subgraph input["Chat Input"]
A1["Jinba App Chat"]
A2["REST API"]
A3["MCP / AI Assistant"]
end
subgraph flow["Jinba Flow — RAG Pipeline"]
B1["Receive Question
INPUT_TEXT"]
B2["Search Knowledge Base
JINBA_VECTOR_SEARCH"]
B3["Generate Answer
OPENAI_INVOKE or ANTHROPIC_INVOKE"]
end
subgraph kb["Knowledge Backend"]
C1["Jinba Knowledge Base"]
C2["Pinecone"]
C3["Azure AI Search"]
end
A1 & A2 & A3 --> B1
B1 --> B2
B2 --> C1
B2 -.-> C2
B2 -.-> C3
C1 & C2 & C3 --> B3
B3 --> A1 & A2 & A3
```
This tutorial uses **Jinba Knowledge Base** as the primary backend. For other backends, see [Alternative Backends](#alternative-backends) near the end.
***
## Part 1: Set Up Your Knowledge Base
### Step 1: Create a Knowledge Base
In your workspace sidebar, click **Storage**, then select the **Knowledge Bases** tab.
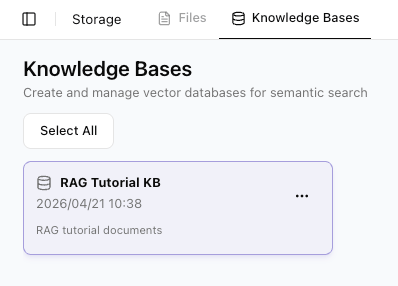
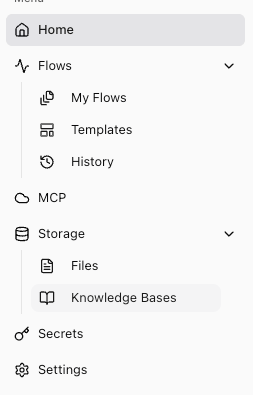 Click **Create Knowledge Base**. Enter a descriptive name (for example, "Product Documentation" or "Company FAQ").
 After creation, open your new knowledge base and confirm it appears in the list. In this tutorial, the example knowledge base is named **RAG Tutorial KB**.
 ### Step 2: Upload Documents
Click on your newly created knowledge base from the Storage page.
Click **Add files** to open the upload dialog. Select your PDFs, DOCX, Markdown, or text files from your computer.
### Step 2: Upload Documents
Click on your newly created knowledge base from the Storage page.
Click **Add files** to open the upload dialog. Select your PDFs, DOCX, Markdown, or text files from your computer.
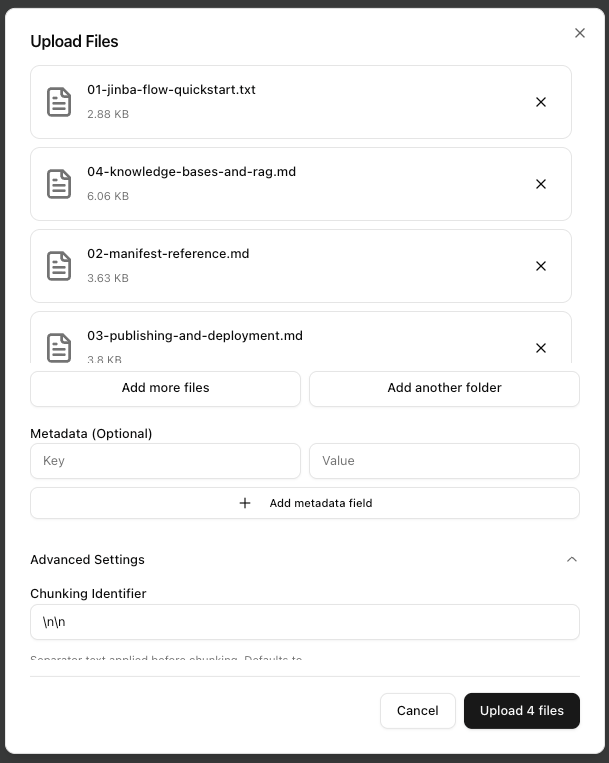 Files are automatically processed through the following pipeline:
| Stage | What Happens |
| ------------- | --------------------------------------------- |
| **Parsing** | Text is extracted from your documents |
| **Chunking** | Documents are split into searchable chunks |
| **Embedding** | Chunks are converted to vector embeddings |
| **Indexing** | Vectors are stored for fast similarity search |
Wait until all files show **Ready** status.
Files are automatically processed through the following pipeline:
| Stage | What Happens |
| ------------- | --------------------------------------------- |
| **Parsing** | Text is extracted from your documents |
| **Chunking** | Documents are split into searchable chunks |
| **Embedding** | Chunks are converted to vector embeddings |
| **Indexing** | Vectors are stored for fast similarity search |
Wait until all files show **Ready** status.
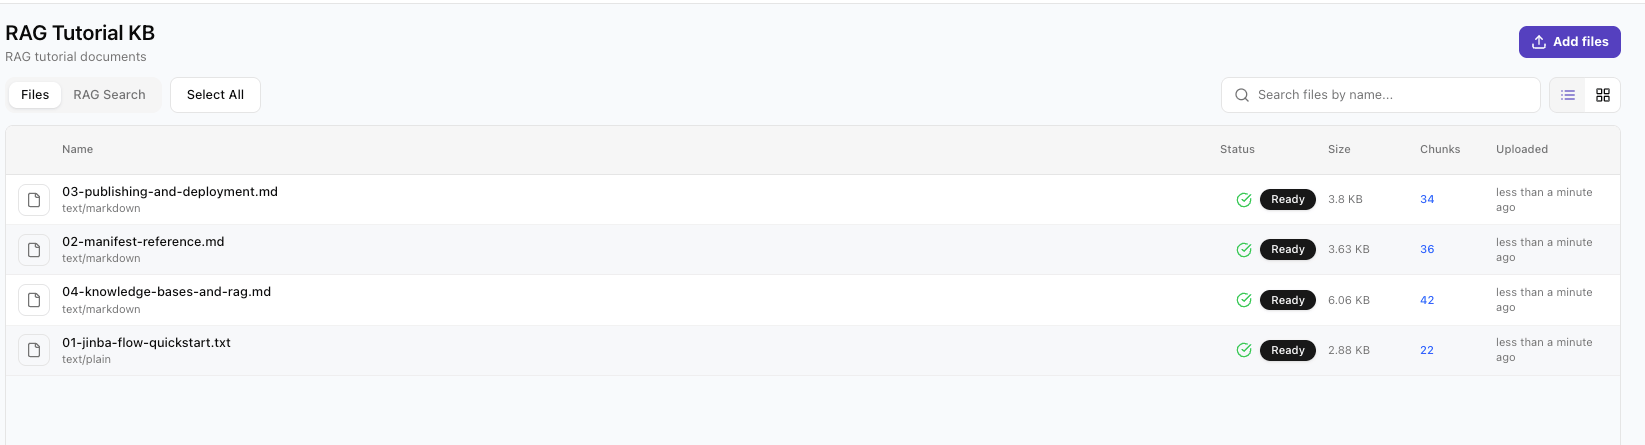 Processing may take a few minutes depending on file size. Do not proceed until your files show a completed status.
### Step 3: Store Your Credentials
Before building the flow, store the required secrets in your workspace.
Go to your [workspace credentials](/en/pages/credentials/index) page.
Add the following secrets:
| Secret Name | Value | Purpose |
| ------------------- | ----------------------------------- | ----------------------------------------- |
| `JINBA_API_TOKEN` | Your Jinba API token | Authenticates vector search |
| `KNOWLEDGE_BASE_ID` | Your knowledge base ID from Step 1 | Identifies which knowledge base to search |
| `ANTHROPIC_API_KEY` | Your Anthropic API key *(optional)* | For Claude-based generation |
If you do not have an OpenAI API key, you can still use `OPENAI_INVOKE` with [Jinba API credit](/en/pages/tools/ai/openai).
***
## Part 2: Build the RAG Flow
Now let's create the workflow that powers the chat system.
### The Complete Manifest
You can paste this directly into the [YAML Coding Panel](/en/pages/basics/manifest):
```yaml theme={null}
# Step 1: Receive the user's question
- id: user_question
name: Receive Question
tool: INPUT_TEXT
input:
- name: value
value: ""
# Step 2: Search the knowledge base for relevant content
- id: search_knowledge
name: Search Knowledge Base
tool: JINBA_VECTOR_SEARCH
config:
- name: token
value: "{{secrets.JINBAFLOW_WS_API_KEY}}"
input:
- name: query
value: "{{steps.user_question.result}}"
- name: knowledgeBaseId
value: YOUR_KB_ID_HERE
- name: topK
value: 5
- name: threshold
value: 0.3
needs:
- user_question
# Step 3: Generate an answer using the retrieved context
- id: generate_answer
name: Generate Answer
tool: OPENAI_INVOKE
config:
- name: version
value: gpt-4o
input:
- name: prompt
value: |
## Instructions
You are a helpful assistant. Answer the user's question based ONLY
on the provided context. If the context doesn't contain the answer,
say "I don't have enough information to answer that question."
Always cite which source document(s) your answer comes from.
## Context (from knowledge base)
{{steps.search_knowledge.results | dump}}
## User Question
{{steps.user_question.result}}
Please provide a clear, concise answer based on the context above.
needs:
- search_knowledge
# Step 4: Output the answer
- id: output_answer
name: Output Answer
tool: OUTPUT_TEXT
input:
- name: value
value: "{{steps.generate_answer.result.content}}"
needs:
- generate_answer
```
Fastest path: paste the full YAML manifest above. If you prefer building flows visually, you can also add the four nodes manually in the editor and configure them one by one.
### Alternative: Build the Flow Manually in the Editor
If you want to learn how each node is assembled visually, follow this manual path instead of pasting YAML.
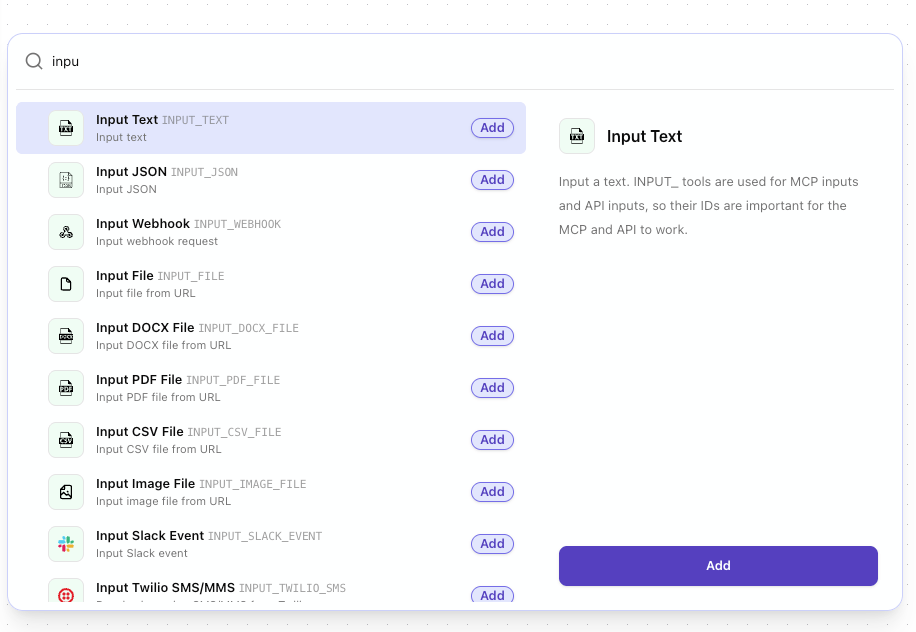
Open the node picker, search for **Input Text**, and add it as the first node in the graph.
Processing may take a few minutes depending on file size. Do not proceed until your files show a completed status.
### Step 3: Store Your Credentials
Before building the flow, store the required secrets in your workspace.
Go to your [workspace credentials](/en/pages/credentials/index) page.
Add the following secrets:
| Secret Name | Value | Purpose |
| ------------------- | ----------------------------------- | ----------------------------------------- |
| `JINBA_API_TOKEN` | Your Jinba API token | Authenticates vector search |
| `KNOWLEDGE_BASE_ID` | Your knowledge base ID from Step 1 | Identifies which knowledge base to search |
| `ANTHROPIC_API_KEY` | Your Anthropic API key *(optional)* | For Claude-based generation |
If you do not have an OpenAI API key, you can still use `OPENAI_INVOKE` with [Jinba API credit](/en/pages/tools/ai/openai).
***
## Part 2: Build the RAG Flow
Now let's create the workflow that powers the chat system.
### The Complete Manifest
You can paste this directly into the [YAML Coding Panel](/en/pages/basics/manifest):
```yaml theme={null}
# Step 1: Receive the user's question
- id: user_question
name: Receive Question
tool: INPUT_TEXT
input:
- name: value
value: ""
# Step 2: Search the knowledge base for relevant content
- id: search_knowledge
name: Search Knowledge Base
tool: JINBA_VECTOR_SEARCH
config:
- name: token
value: "{{secrets.JINBAFLOW_WS_API_KEY}}"
input:
- name: query
value: "{{steps.user_question.result}}"
- name: knowledgeBaseId
value: YOUR_KB_ID_HERE
- name: topK
value: 5
- name: threshold
value: 0.3
needs:
- user_question
# Step 3: Generate an answer using the retrieved context
- id: generate_answer
name: Generate Answer
tool: OPENAI_INVOKE
config:
- name: version
value: gpt-4o
input:
- name: prompt
value: |
## Instructions
You are a helpful assistant. Answer the user's question based ONLY
on the provided context. If the context doesn't contain the answer,
say "I don't have enough information to answer that question."
Always cite which source document(s) your answer comes from.
## Context (from knowledge base)
{{steps.search_knowledge.results | dump}}
## User Question
{{steps.user_question.result}}
Please provide a clear, concise answer based on the context above.
needs:
- search_knowledge
# Step 4: Output the answer
- id: output_answer
name: Output Answer
tool: OUTPUT_TEXT
input:
- name: value
value: "{{steps.generate_answer.result.content}}"
needs:
- generate_answer
```
Fastest path: paste the full YAML manifest above. If you prefer building flows visually, you can also add the four nodes manually in the editor and configure them one by one.
### Alternative: Build the Flow Manually in the Editor
If you want to learn how each node is assembled visually, follow this manual path instead of pasting YAML.
Open the node picker, search for **Input Text**, and add it as the first node in the graph.
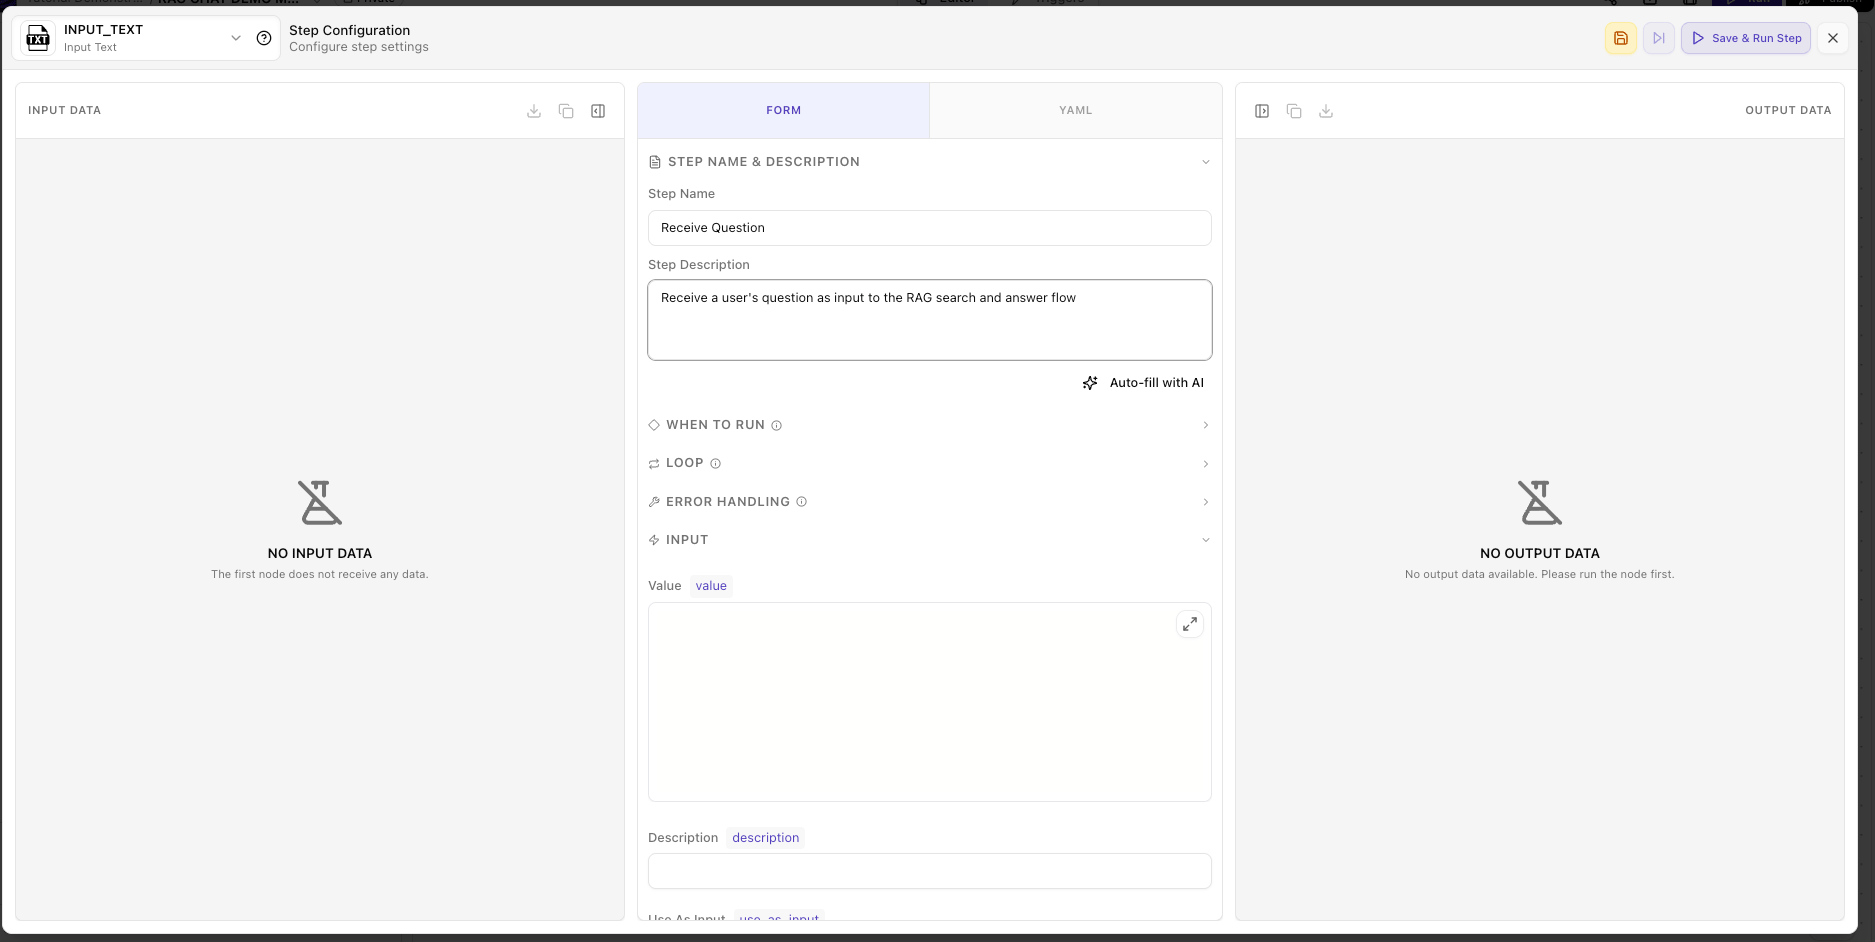
 After adding it, rename the node to **Receive Question** so it matches the tutorial manifest.
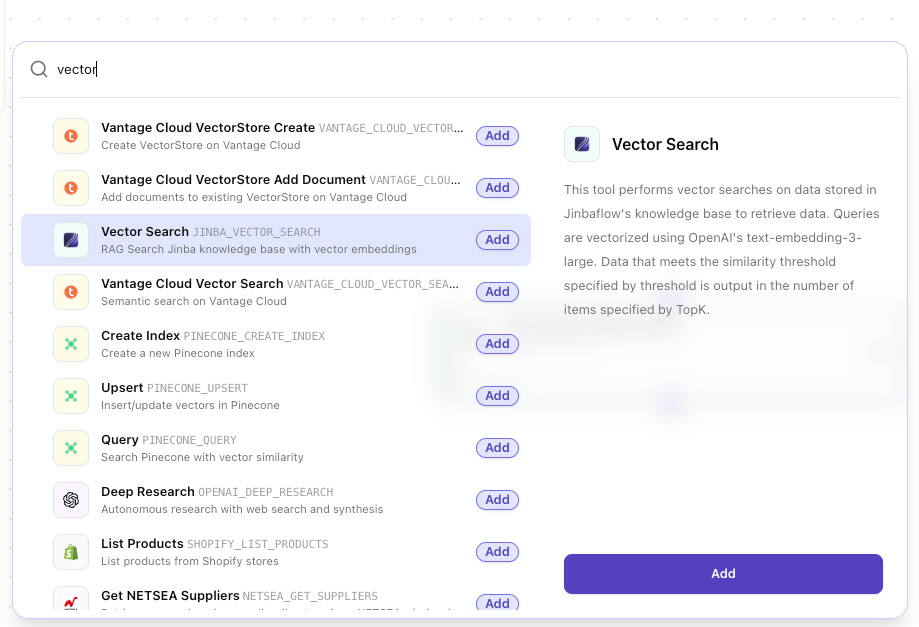
 Click the **+** connector under the first node, search for **Vector Search**, and add the `JINBA_VECTOR_SEARCH` node.
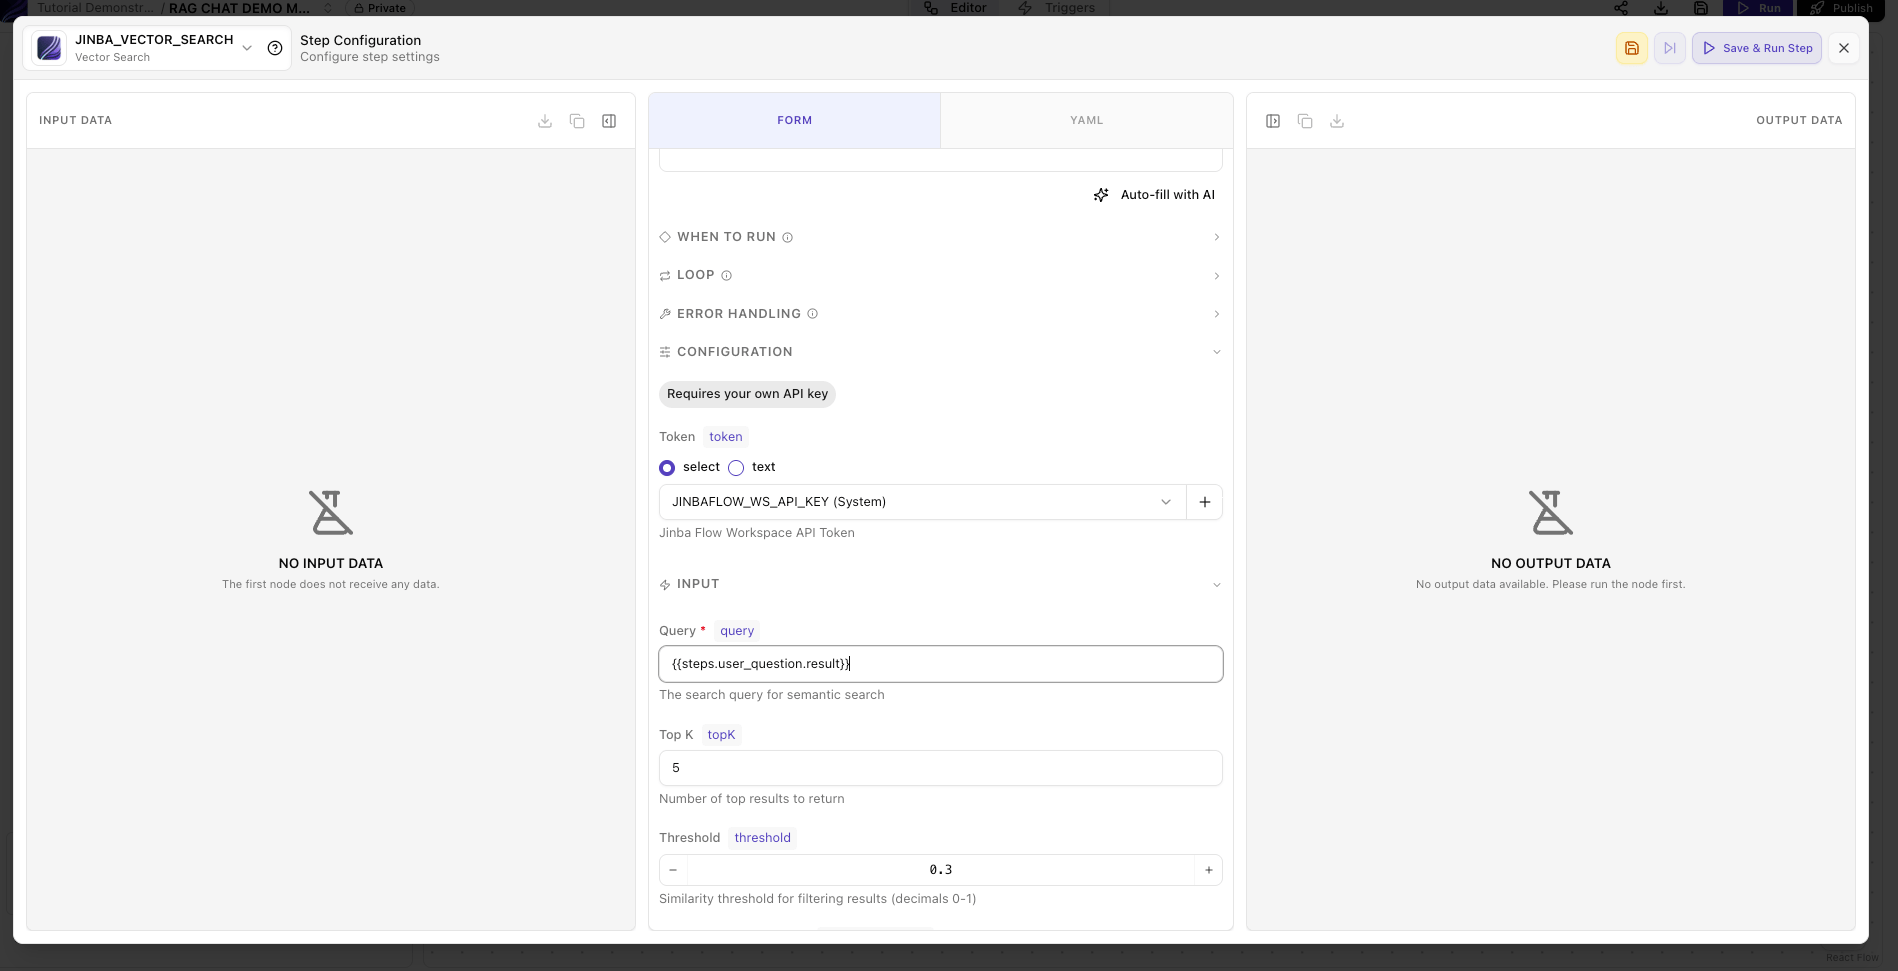
 Then configure it with:
* **Token**: `JINBAFLOW_WS_API_KEY` secret
* **Query**: `{{steps.user_question.result}}`
* **Knowledge Base ID**: your knowledge base ID
* **Top K**: `5`
* **Threshold**: `0.3`
Then configure it with:
* **Token**: `JINBAFLOW_WS_API_KEY` secret
* **Query**: `{{steps.user_question.result}}`
* **Knowledge Base ID**: your knowledge base ID
* **Top K**: `5`
* **Threshold**: `0.3`
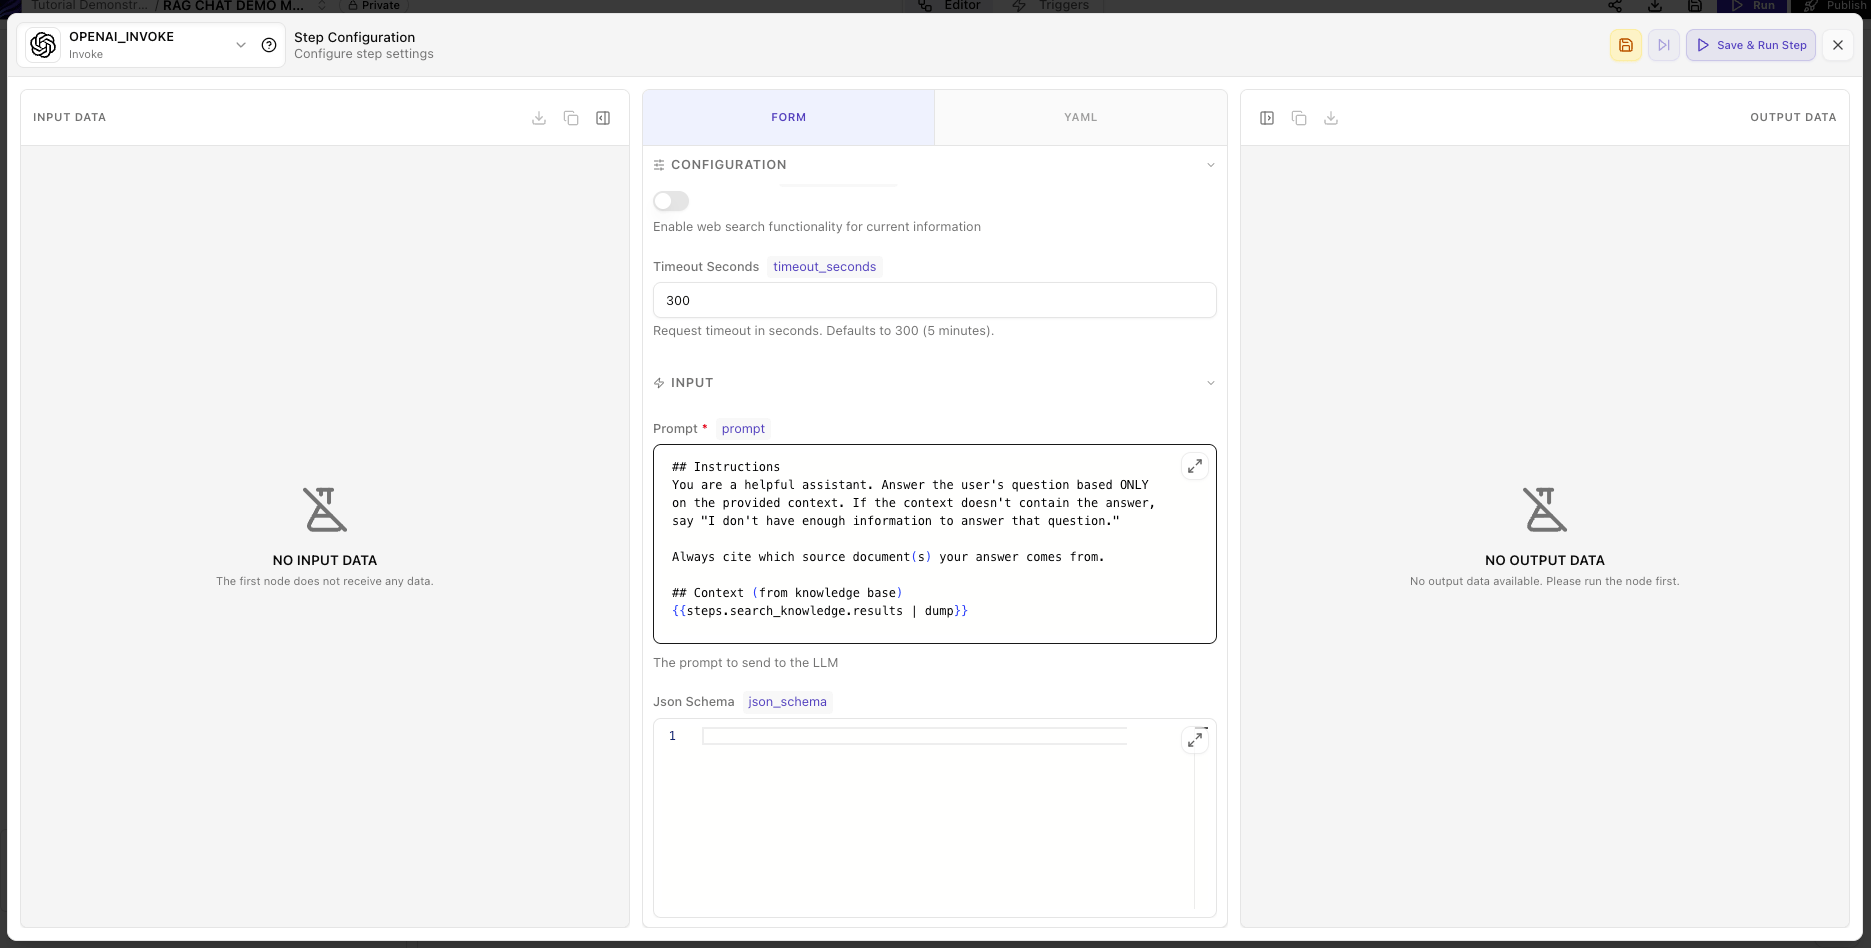
 Add an **Invoke** node and choose `OPENAI_INVOKE`.
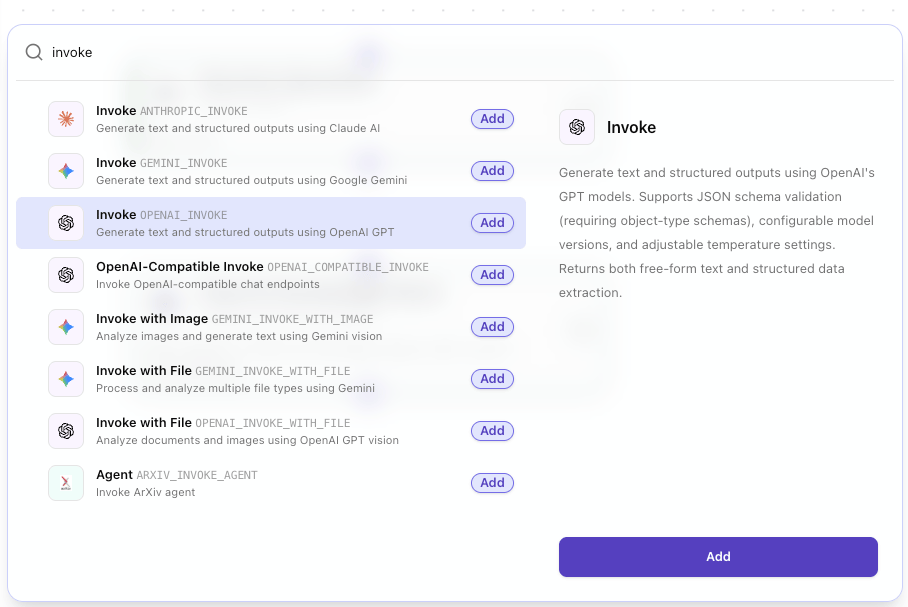 Set the model version to `gpt-4o`, then paste the same prompt shown in the YAML example so the model answers only from retrieved knowledge base context.
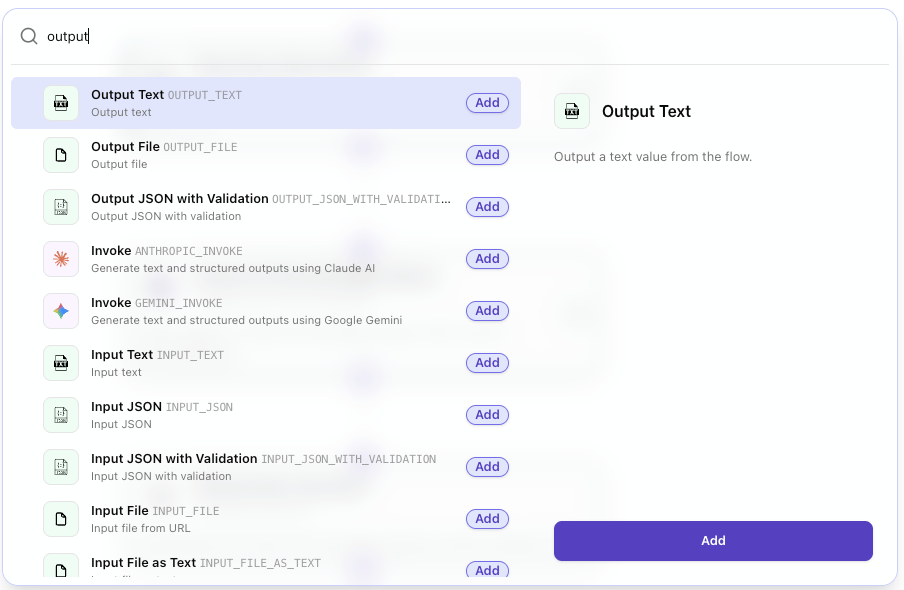
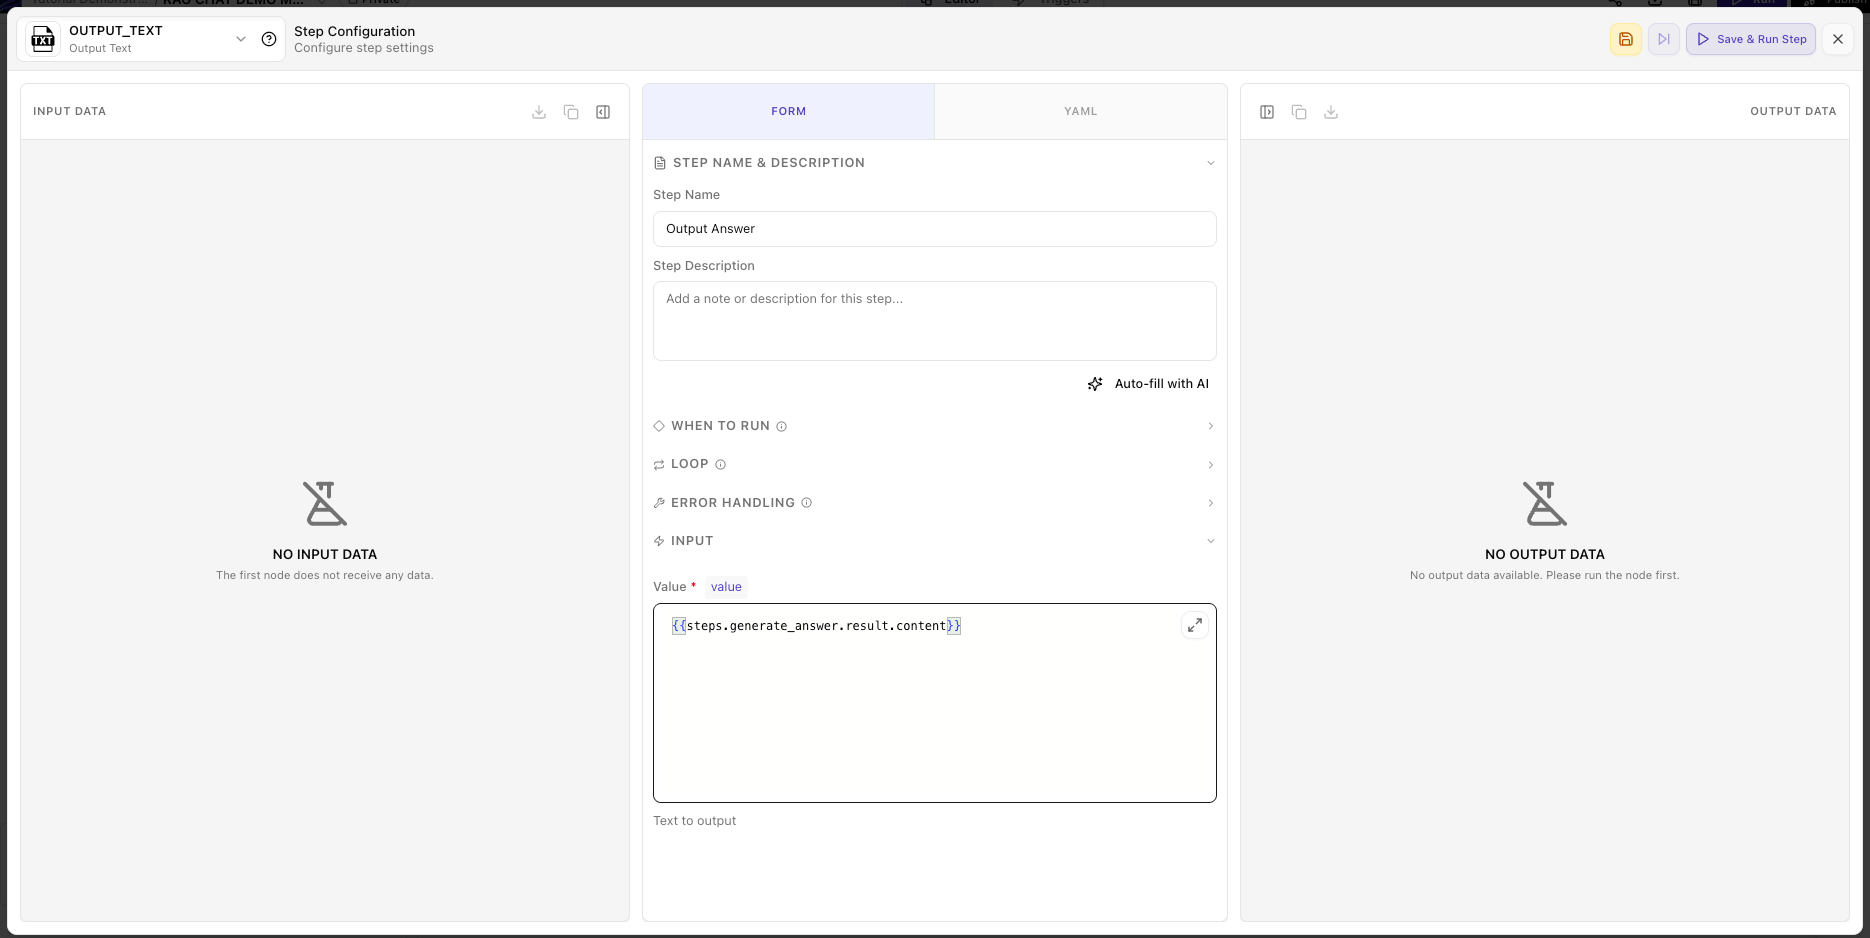
 Add an **Output Text** node as the final step.
 Rename it to **Output Answer**, and set its value to:
```text theme={null}
{{steps.generate_answer.result.content}}
```
Rename it to **Output Answer**, and set its value to:
```text theme={null}
{{steps.generate_answer.result.content}}
```
 ### Step-by-Step Walkthrough
#### Step 1: Receive Question (`INPUT_TEXT`)
```yaml theme={null}
- id: user_question
name: Receive Question
tool: INPUT_TEXT
input:
- name: value
value: ""
```
The `INPUT_TEXT` tool creates an input parameter for the flow. When executed manually, it shows a text box. When called via API, this becomes a parameter in the request body. Learn more about [input tools](/en/pages/tools/files/input).
#### Step 2: Search Knowledge Base (`JINBA_VECTOR_SEARCH`)
```yaml theme={null}
- id: search_knowledge
name: Search Knowledge Base
tool: JINBA_VECTOR_SEARCH
config:
- name: token
value: "{{secrets.JINBAFLOW_WS_API_KEY}}"
input:
- name: query
value: "{{steps.user_question.result}}"
- name: knowledgeBaseId
value: YOUR_KB_ID_HERE
- name: topK
value: 5
- name: threshold
value: 0.3
needs:
- user_question
```
This step performs semantic search — finding content by meaning, not just keywords.
| Parameter | Value | Why |
| ----------- | ----- | ---------------------------------- |
| `topK` | 5 | Returns the 5 most relevant chunks |
| `threshold` | 0.3 | Filters out low-relevance results |
The `needs: [user_question]` ensures the search waits for the user's question before executing. See [Step Module Options](/en/pages/basics/step-options) for more details.
Start with `topK: 5` and `threshold: 0.3`. If answers lack context, increase `topK`. If irrelevant content appears, increase `threshold`. See the [Vector Search reference](/en/pages/tools/jinba/vector_search) for more guidance.
#### Step 3: Generate Answer (LLM)
```yaml theme={null}
- id: generate_answer
name: Generate Answer
tool: OPENAI_INVOKE
config:
- name: version
value: gpt-4o
input:
- name: prompt
value: |
## Instructions
You are a helpful assistant. Answer the user's question based ONLY
on the provided context. If the context doesn't contain the answer,
say "I don't have enough information to answer that question."
Always cite which source document(s) your answer comes from.
## Context (from knowledge base)
{{steps.search_knowledge.results | dump}}
## User Question
{{steps.user_question.result}}
Please provide a clear, concise answer based on the context above.
needs:
- search_knowledge
```
The `| dump` filter serializes the search results into the prompt so the LLM can read all retrieved chunks and their sources. Learn more about [Variables & Templates](/en/pages/basics/variables).
#### Step 4: Output Answer (`OUTPUT_TEXT`)
```yaml theme={null}
- id: output_answer
name: Output Answer
tool: OUTPUT_TEXT
input:
- name: value
value: "{{steps.generate_answer.result.content}}"
needs:
- generate_answer
```
The `OUTPUT_TEXT` step captures the final answer as the flow's output, making it available when calling the flow via API or chat.
Replace the generation step with:
```yaml theme={null}
- id: generate_answer
name: Generate Answer
tool: ANTHROPIC_INVOKE
config:
- name: version
value: claude-3-5-sonnet-20241022
- name: token
value: "{{secrets.ANTHROPIC_API_KEY}}"
input:
- name: prompt
value: |
... (same prompt as above)
needs:
- search_knowledge
```
See the [Anthropic tool reference](/en/pages/tools/ai/anthropic) for details.
Replace the generation step with:
```yaml theme={null}
- id: generate_answer
name: Generate Answer
tool: GEMINI_INVOKE
config:
- name: version
value: gemini-1.5-flash
- name: token
value: "{{secrets.GEMINI_API_KEY}}"
input:
- name: prompt
value: |
... (same prompt as above)
needs:
- search_knowledge
```
See the [Gemini tool reference](/en/pages/tools/ai/gemini) for details.
### Test Your Flow
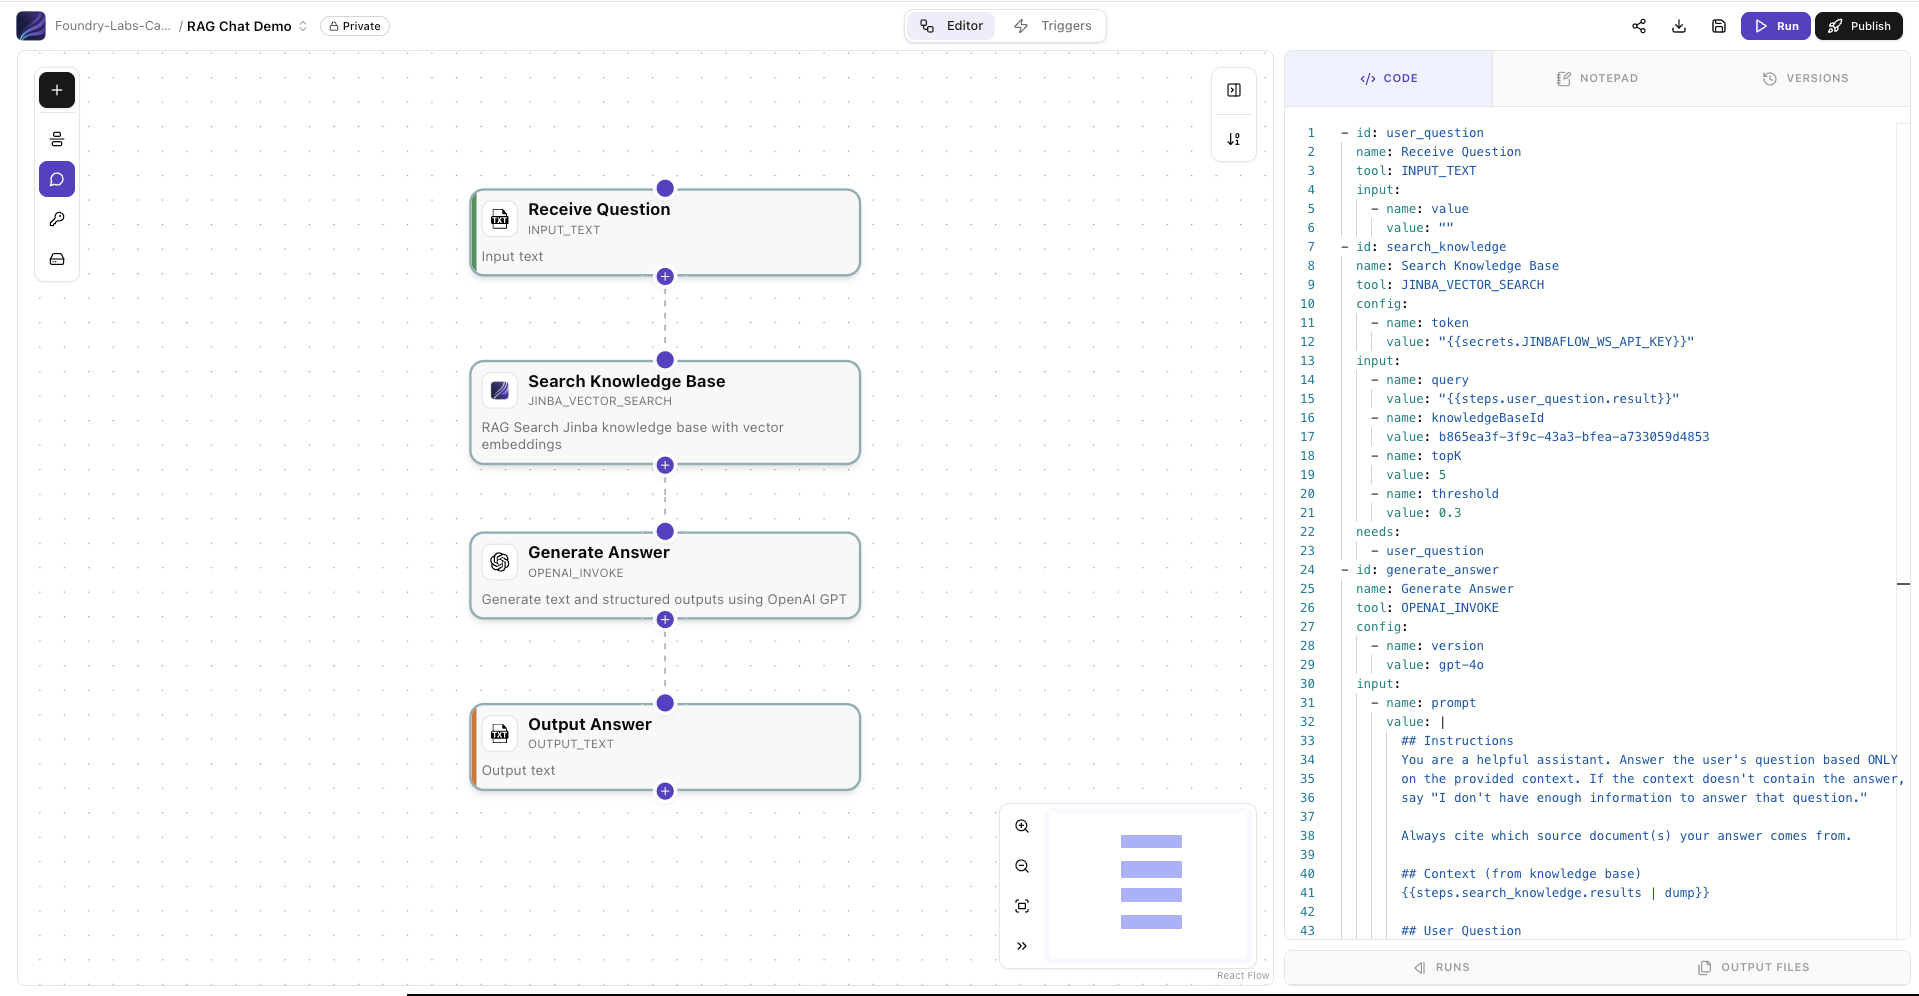
Build the four-step flow in the editor, then click the **Run** button in the top right.
### Step-by-Step Walkthrough
#### Step 1: Receive Question (`INPUT_TEXT`)
```yaml theme={null}
- id: user_question
name: Receive Question
tool: INPUT_TEXT
input:
- name: value
value: ""
```
The `INPUT_TEXT` tool creates an input parameter for the flow. When executed manually, it shows a text box. When called via API, this becomes a parameter in the request body. Learn more about [input tools](/en/pages/tools/files/input).
#### Step 2: Search Knowledge Base (`JINBA_VECTOR_SEARCH`)
```yaml theme={null}
- id: search_knowledge
name: Search Knowledge Base
tool: JINBA_VECTOR_SEARCH
config:
- name: token
value: "{{secrets.JINBAFLOW_WS_API_KEY}}"
input:
- name: query
value: "{{steps.user_question.result}}"
- name: knowledgeBaseId
value: YOUR_KB_ID_HERE
- name: topK
value: 5
- name: threshold
value: 0.3
needs:
- user_question
```
This step performs semantic search — finding content by meaning, not just keywords.
| Parameter | Value | Why |
| ----------- | ----- | ---------------------------------- |
| `topK` | 5 | Returns the 5 most relevant chunks |
| `threshold` | 0.3 | Filters out low-relevance results |
The `needs: [user_question]` ensures the search waits for the user's question before executing. See [Step Module Options](/en/pages/basics/step-options) for more details.
Start with `topK: 5` and `threshold: 0.3`. If answers lack context, increase `topK`. If irrelevant content appears, increase `threshold`. See the [Vector Search reference](/en/pages/tools/jinba/vector_search) for more guidance.
#### Step 3: Generate Answer (LLM)
```yaml theme={null}
- id: generate_answer
name: Generate Answer
tool: OPENAI_INVOKE
config:
- name: version
value: gpt-4o
input:
- name: prompt
value: |
## Instructions
You are a helpful assistant. Answer the user's question based ONLY
on the provided context. If the context doesn't contain the answer,
say "I don't have enough information to answer that question."
Always cite which source document(s) your answer comes from.
## Context (from knowledge base)
{{steps.search_knowledge.results | dump}}
## User Question
{{steps.user_question.result}}
Please provide a clear, concise answer based on the context above.
needs:
- search_knowledge
```
The `| dump` filter serializes the search results into the prompt so the LLM can read all retrieved chunks and their sources. Learn more about [Variables & Templates](/en/pages/basics/variables).
#### Step 4: Output Answer (`OUTPUT_TEXT`)
```yaml theme={null}
- id: output_answer
name: Output Answer
tool: OUTPUT_TEXT
input:
- name: value
value: "{{steps.generate_answer.result.content}}"
needs:
- generate_answer
```
The `OUTPUT_TEXT` step captures the final answer as the flow's output, making it available when calling the flow via API or chat.
Replace the generation step with:
```yaml theme={null}
- id: generate_answer
name: Generate Answer
tool: ANTHROPIC_INVOKE
config:
- name: version
value: claude-3-5-sonnet-20241022
- name: token
value: "{{secrets.ANTHROPIC_API_KEY}}"
input:
- name: prompt
value: |
... (same prompt as above)
needs:
- search_knowledge
```
See the [Anthropic tool reference](/en/pages/tools/ai/anthropic) for details.
Replace the generation step with:
```yaml theme={null}
- id: generate_answer
name: Generate Answer
tool: GEMINI_INVOKE
config:
- name: version
value: gemini-1.5-flash
- name: token
value: "{{secrets.GEMINI_API_KEY}}"
input:
- name: prompt
value: |
... (same prompt as above)
needs:
- search_knowledge
```
See the [Gemini tool reference](/en/pages/tools/ai/gemini) for details.
### Test Your Flow
Build the four-step flow in the editor, then click the **Run** button in the top right.
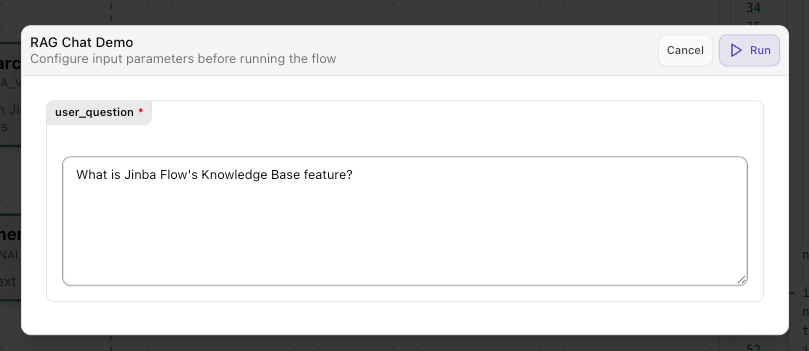
 When prompted, enter a question that your uploaded documents should be able to answer.
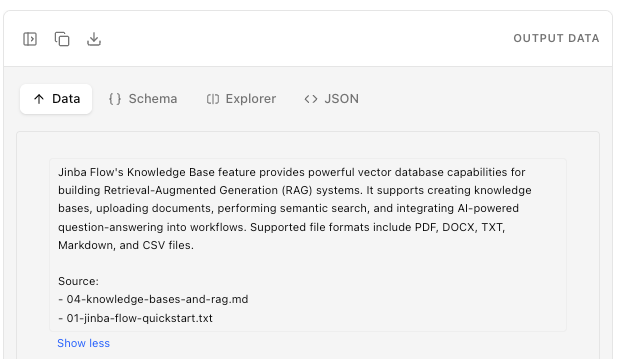
 Check the execution results. The answer should reference information from your knowledge base.
 ***
## Part 3: Deploy as a Chat Interface
Your RAG flow works. Now make it accessible to users.
Best for: End users who need a ready-made chat UI
Best for: Custom applications and integrations
Best for: AI assistant integration
### Option A: Jinba App Chat (Recommended)
Deploy your RAG flow as a chat connector in Jinba App for the simplest end-user experience.
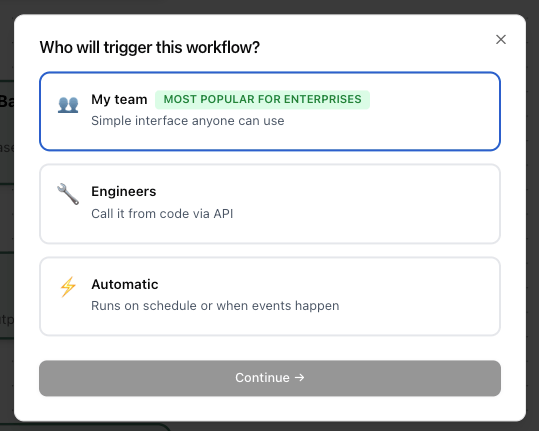
In the flow editor, click the **Publish** button. A dialog will ask **"Who will trigger this workflow?"**:
***
## Part 3: Deploy as a Chat Interface
Your RAG flow works. Now make it accessible to users.
Best for: End users who need a ready-made chat UI
Best for: Custom applications and integrations
Best for: AI assistant integration
### Option A: Jinba App Chat (Recommended)
Deploy your RAG flow as a chat connector in Jinba App for the simplest end-user experience.
In the flow editor, click the **Publish** button. A dialog will ask **"Who will trigger this workflow?"**:
 | Option | Description | When to choose |
| ------------- | -------------------------------------- | --------------------------------------------- |
| **My team** | Simple interface anyone can use | ✅ Choose this for the chat UI path (Option A) |
| **Engineers** | Call it from code via API | Choose this for the API path (Option B) |
| **Automatic** | Runs on schedule or when events happen | Choose this for scheduled/event-driven flows |
Select **My team** and click **Continue →**.
| Option | Description | When to choose |
| ------------- | -------------------------------------- | --------------------------------------------- |
| **My team** | Simple interface anyone can use | ✅ Choose this for the chat UI path (Option A) |
| **Engineers** | Call it from code via API | Choose this for the API path (Option B) |
| **Automatic** | Runs on schedule or when events happen | Choose this for scheduled/event-driven flows |
Select **My team** and click **Continue →**.
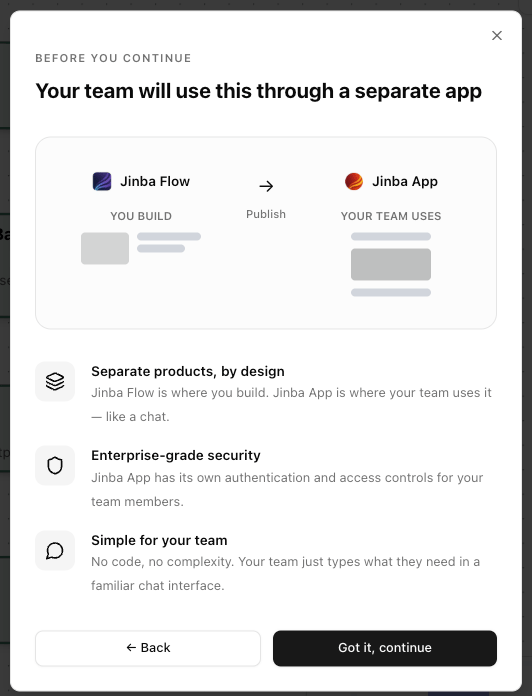
 After selecting "My team", an education screen appears explaining that **Jinba Flow** (where you build) and **Jinba App** (where your team uses it) are separate products:
* **Separate products, by design** — Jinba Flow is the builder; Jinba App is the chat interface your team uses
* **Enterprise-grade security** — Jinba App has its own authentication and access controls
* **Simple for your team** — No code, no complexity — just a familiar chat interface
Click **Got it, continue** to proceed to the MCP setup.
After selecting "My team", an education screen appears explaining that **Jinba Flow** (where you build) and **Jinba App** (where your team uses it) are separate products:
* **Separate products, by design** — Jinba Flow is the builder; Jinba App is the chat interface your team uses
* **Enterprise-grade security** — Jinba App has its own authentication and access controls
* **Simple for your team** — No code, no complexity — just a familiar chat interface
Click **Got it, continue** to proceed to the MCP setup.
 The **Create an MCP** dialog appears. This shows a preview of how your flow will appear as a chat tool:
* A chat preview showing `@your_flow_name` with a description
* A **Demo** button to preview the chat experience
* An **Enable MCP for this flow** toggle
The **Create an MCP** dialog appears. This shows a preview of how your flow will appear as a chat tool:
* A chat preview showing `@your_flow_name` with a description
* A **Demo** button to preview the chat experience
* An **Enable MCP for this flow** toggle
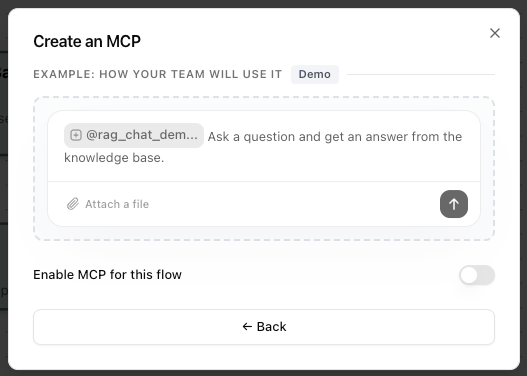 You **must** turn on the **Enable MCP for this flow** toggle. This is what creates the connection between Jinba Flow and Jinba App — the "Connect with Jinba App" button only appears after you enable it.
Once enabled, additional options appear:
* **Workspace Token** — used for authentication
* **Connection Snippet** — JSON config for MCP clients (Claude Desktop, Cursor, etc.)
* **Connect with Jinba App** button — click this to open the connector in Jinba App
Enabling MCP also lets AI assistants (Claude, Cursor, etc.) call this flow as a tool — you get both Jinba App chat **and** MCP tool access with a single toggle.
See [Publish](/en/pages/basics/publish) for details.
After enabling MCP, you'll be taken to the **MCP → Connect** tab. This page has several important sections:
1. **Your Token** — your workspace authentication token (keep this secret)
2. **1-Click Connect** — click **Connect** to instantly link this flow to Jinba App
3. **Visibility** — defaults to "Unlisted" (only users in your access rules can use it). Change to "Listed" if you want all workspace members to see it
4. **Access Scope Settings** — configure who can access this tool using JWT claims (e.g., email whitelist)
5. **MCP Configuration JSON Snippet** — copy this to use the flow in external MCP clients (Claude Desktop, Cursor, etc.)
You **must** turn on the **Enable MCP for this flow** toggle. This is what creates the connection between Jinba Flow and Jinba App — the "Connect with Jinba App" button only appears after you enable it.
Once enabled, additional options appear:
* **Workspace Token** — used for authentication
* **Connection Snippet** — JSON config for MCP clients (Claude Desktop, Cursor, etc.)
* **Connect with Jinba App** button — click this to open the connector in Jinba App
Enabling MCP also lets AI assistants (Claude, Cursor, etc.) call this flow as a tool — you get both Jinba App chat **and** MCP tool access with a single toggle.
See [Publish](/en/pages/basics/publish) for details.
After enabling MCP, you'll be taken to the **MCP → Connect** tab. This page has several important sections:
1. **Your Token** — your workspace authentication token (keep this secret)
2. **1-Click Connect** — click **Connect** to instantly link this flow to Jinba App
3. **Visibility** — defaults to "Unlisted" (only users in your access rules can use it). Change to "Listed" if you want all workspace members to see it
4. **Access Scope Settings** — configure who can access this tool using JWT claims (e.g., email whitelist)
5. **MCP Configuration JSON Snippet** — copy this to use the flow in external MCP clients (Claude Desktop, Cursor, etc.)
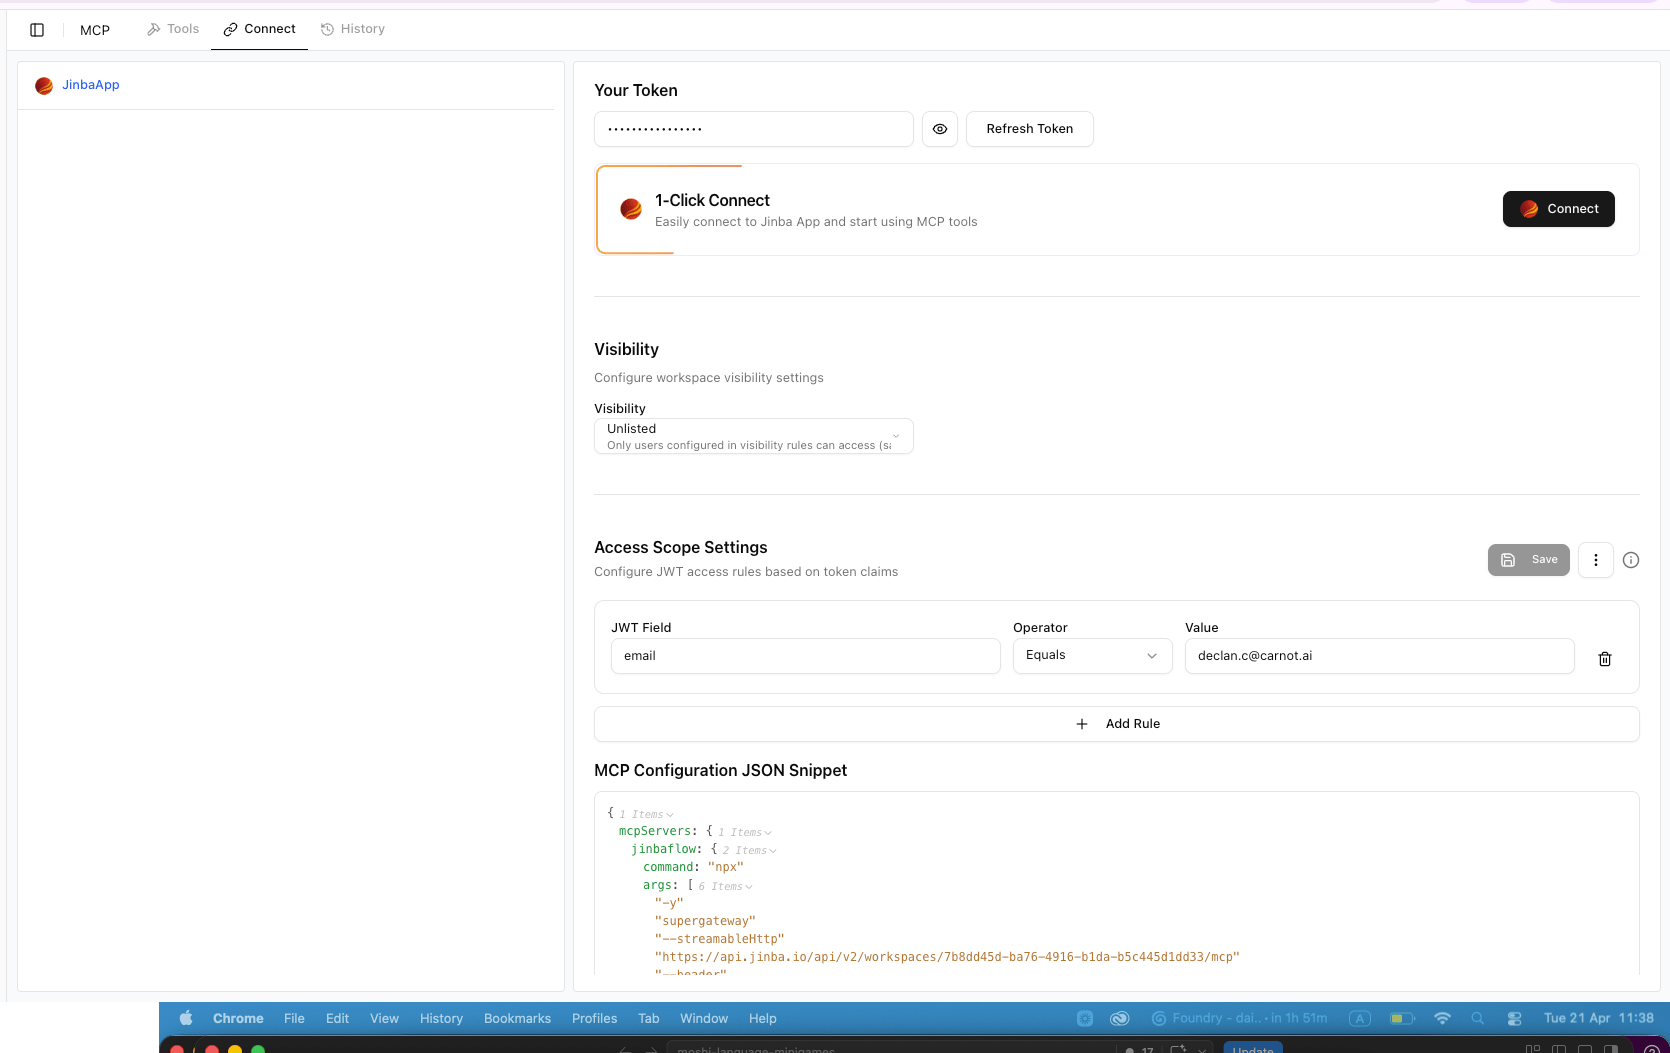 You **must** click the **1-Click Connect** button to make the flow available as a tool in Jinba App. Without this step, the tool won't appear in Jinba App even though MCP is enabled.
Add your team members' emails to the **Access Scope Settings** so they can also use this tool. Click **+ Add Rule** to add more email rules.
Open [Jinba App](https://app.jinba.io/) and start a new chat:
1. Click **New Chat**
2. Click the **connectors** icon (⚙️) at the bottom of the chat input
3. In the "Search agents and connectors..." dropdown, find your workspace's **MCP connector** (e.g., "Tutorial Demonstrations MCP ... 1 tool")
4. Click into the MCP connector to see your **RAG Chat Demo** tool listed
5. Select the tool — it appears as a tag in the chat input bar
6. Type your question and press Enter
You **must** click the **1-Click Connect** button to make the flow available as a tool in Jinba App. Without this step, the tool won't appear in Jinba App even though MCP is enabled.
Add your team members' emails to the **Access Scope Settings** so they can also use this tool. Click **+ Add Rule** to add more email rules.
Open [Jinba App](https://app.jinba.io/) and start a new chat:
1. Click **New Chat**
2. Click the **connectors** icon (⚙️) at the bottom of the chat input
3. In the "Search agents and connectors..." dropdown, find your workspace's **MCP connector** (e.g., "Tutorial Demonstrations MCP ... 1 tool")
4. Click into the MCP connector to see your **RAG Chat Demo** tool listed
5. Select the tool — it appears as a tag in the chat input bar
6. Type your question and press Enter
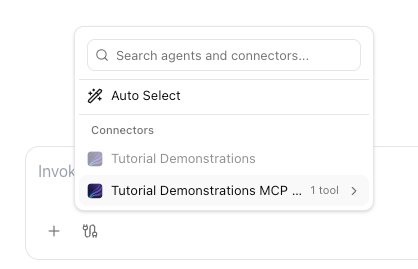 The tool runs automatically — you'll see the **Arguments** (your `user_question`) and **Result** (the RAG response content) in an expandable section, followed by the AI's formatted answer.
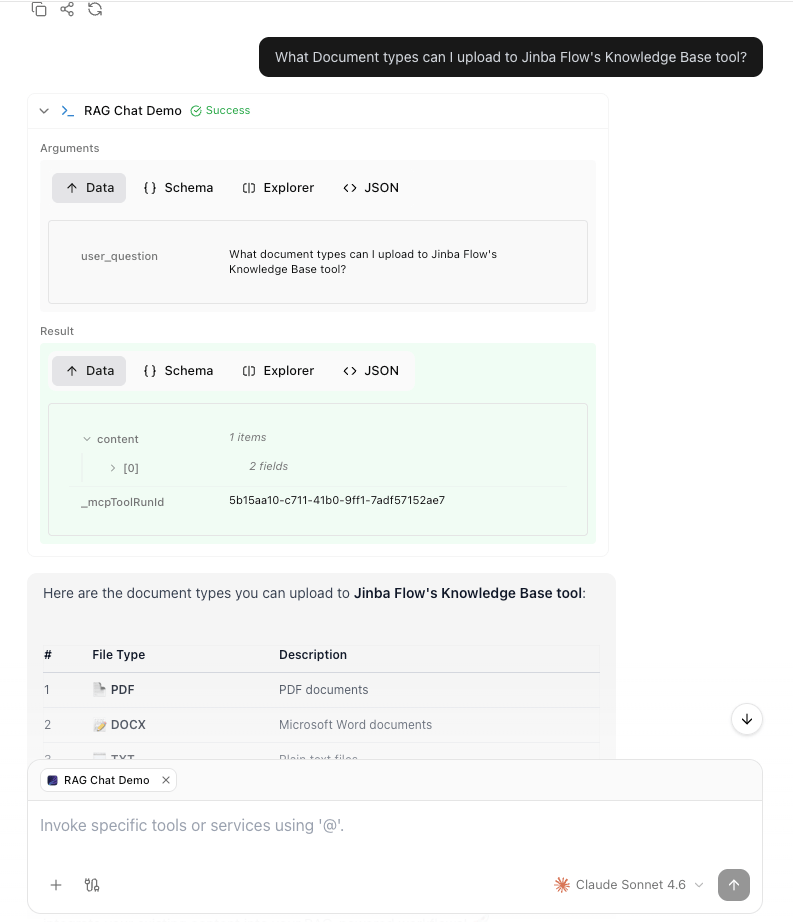 You can also use **Auto Select** mode — Jinba App will automatically choose the right tool based on your question, so you don't need to manually select the connector each time.
See [Jinba Flow Connectors](/en/pages/jinba_app/connectors/jinbaflow) for the full guide.
You can also create a [Jinba App Agent](/en/pages/jinba_app/agents/overview) that bundles this connector with custom instructions.
### Option B: REST API
Expose your RAG flow as an API endpoint for custom applications.
Follow the same publish steps as above, but select **Engineers** in the "Who will trigger this workflow?" dialog instead. This optimizes the flow for API access.
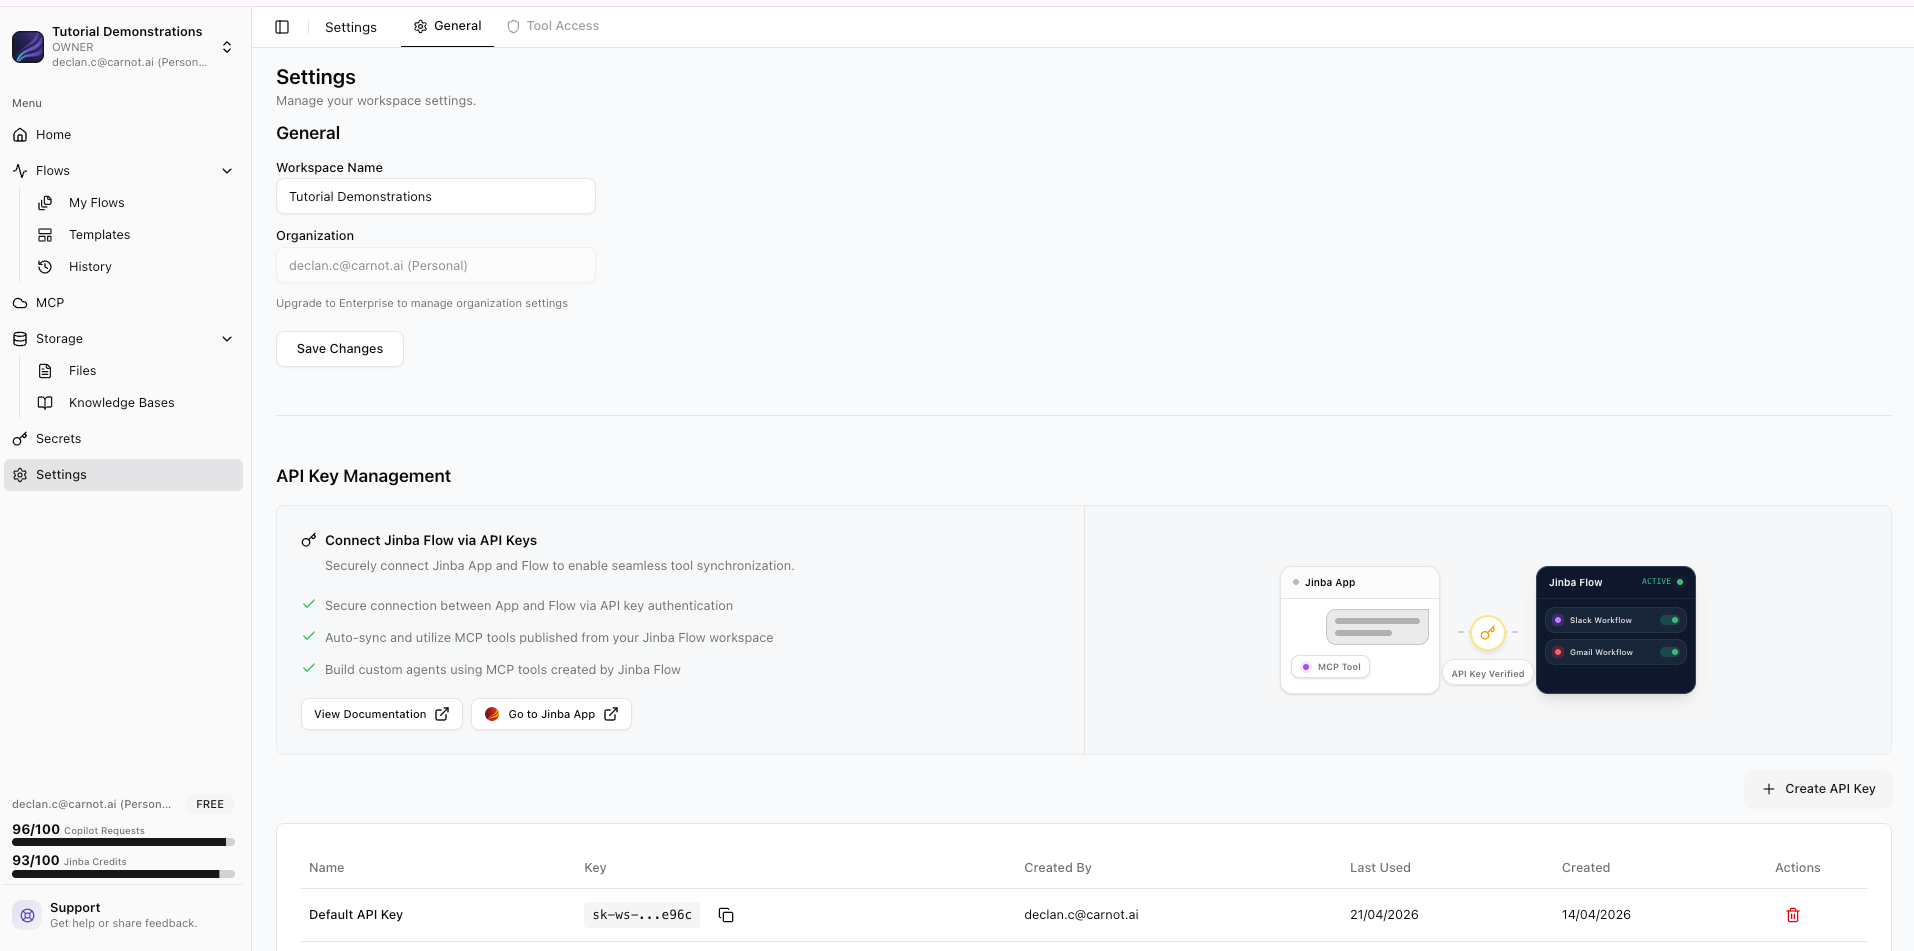
After publishing, navigate to your flow's settings to find the auto-generated API key.
You can also use **Auto Select** mode — Jinba App will automatically choose the right tool based on your question, so you don't need to manually select the connector each time.
See [Jinba Flow Connectors](/en/pages/jinba_app/connectors/jinbaflow) for the full guide.
You can also create a [Jinba App Agent](/en/pages/jinba_app/agents/overview) that bundles this connector with custom instructions.
### Option B: REST API
Expose your RAG flow as an API endpoint for custom applications.
Follow the same publish steps as above, but select **Engineers** in the "Who will trigger this workflow?" dialog instead. This optimizes the flow for API access.
After publishing, navigate to your flow's settings to find the auto-generated API key.
 ```bash theme={null}
curl -X POST https://api.jinba.dev/api/v2/external/flows/{flow-id}/published-run \
-H "Authorization: Bearer YOUR_API_KEY" \
-H "Content-Type: application/json" \
-d '{
"args": [
{"name": "user_question", "value": "What is your return policy?"}
],
"mode": "sync"
}'
```
**Python example:**
```python theme={null}
import requests
response = requests.post(
"https://api.jinba.dev/api/v2/external/flows/{flow-id}/published-run",
headers={
"Authorization": "Bearer YOUR_API_KEY",
"Content-Type": "application/json"
},
json={
"args": [
{"name": "user_question", "value": "What is your return policy?"}
],
"mode": "sync"
}
)
answer = response.json()
print(answer)
```
See the full [API reference](/en/pages/basics/api) for async mode, error handling, and more.
### Option C: MCP Tool (AI Assistant Integration)
Make your RAG flow available as a tool for AI assistants like Claude Desktop.
Publish your flow with MCP enabled. Navigate to the **MCP** tab in your workspace settings.
Add the Jinba Flow MCP server to your AI assistant's configuration:
```json theme={null}
{
"mcpServers": {
"jinbaflow": {
"command": "npx",
"args": [
"-y",
"supergateway",
"--streamableHttp",
"https://api.jinba.io/api/v2/workspaces/YOUR_WORKSPACE_ID/mcp",
"--header",
"Authorization: Bearer YOUR_TOKEN"
]
}
}
}
```
See the [MCP guide](/en/pages/basics/mcp) for the full setup process.
Your RAG flow now appears as a tool. The AI assistant can invoke it to answer questions using your knowledge base.
***
## Part 4: Advanced Patterns
### Multi-Step RAG with Query Refinement
For complex questions, add a refinement step that improves search results:
```yaml theme={null}
- id: user_question
name: Receive Question
tool: INPUT_TEXT
input:
- name: value
value: ""
- id: initial_search
name: Initial Search
tool: JINBA_VECTOR_SEARCH
config:
- name: token
value: "{{secrets.JINBAFLOW_WS_API_KEY}}"
input:
- name: query
value: "{{steps.user_question.result}}"
- name: knowledgeBaseId
value: YOUR_KB_ID_HERE
- name: topK
value: 10
needs:
- user_question
- id: refine_query
name: Refine Query
tool: OPENAI_INVOKE
config:
- name: version
value: gpt-4o
input:
- name: prompt
value: |
Based on the initial search results, generate a more specific search query.
Original Question: {{steps.user_question.result}}
Initial Results:
{{steps.initial_search.results | dump}}
Generate a refined search query that will find more specific information.
Output ONLY the refined query, nothing else.
needs:
- initial_search
- id: refined_search
name: Refined Search
tool: JINBA_VECTOR_SEARCH
config:
- name: token
value: "{{secrets.JINBAFLOW_WS_API_KEY}}"
input:
- name: query
value: "{{steps.refine_query.result.content}}"
- name: knowledgeBaseId
value: YOUR_KB_ID_HERE
- name: topK
value: 5
- name: threshold
value: 0.4
needs:
- refine_query
- id: final_answer
name: Generate Final Answer
tool: OPENAI_INVOKE
config:
- name: version
value: gpt-4o
input:
- name: prompt
value: |
Answer the user's question using the refined search results.
Question: {{steps.user_question.result}}
Refined Search Results:
{{steps.refined_search.results | dump}}
Provide a detailed, accurate answer with source citations.
needs:
- refined_search
- id: output_answer
name: Output Answer
tool: OUTPUT_TEXT
input:
- name: value
value: "{{steps.final_answer.result.content}}"
needs:
- final_answer
```
### Handling No Results Found
Use [conditional execution](/en/pages/basics/step-options) to handle cases where the knowledge base has no relevant content:
```yaml theme={null}
- id: check_results
name: Check Results
tool: PYTHON_SANDBOX_RUN
input:
- name: code
value: |
results = {{steps.search_knowledge.result}}
has_results = len(results.get('results', [])) > 0
print(has_results)
- name: data_type
value: STRING
needs:
- search_knowledge
- id: generate_answer
name: Generate Answer
tool: OPENAI_INVOKE
config:
- name: version
value: gpt-4o
input:
- name: prompt
value: |
... standard RAG prompt with context ...
needs:
- check_results
when: "'{{steps.check_results.result}}' == 'True'"
- id: no_results_response
name: No Results Response
tool: PYTHON_SANDBOX_RUN
input:
- name: code
value: |
result = "I couldn't find relevant information in the knowledge base to answer your question. Please try rephrasing your question or contact support for assistance."
- name: data_type
value: STRING
needs:
- check_results
when: "'{{steps.check_results.result}}' == 'False'"
```
### Keeping Your Knowledge Base Updated
Create a scheduled flow that automatically updates your knowledge base with new documents:
```yaml theme={null}
- id: fetch_new_docs
name: fetch_new_docs
tool: PYTHON_SANDBOX_RUN
input:
- name: code
value: |
new_docs = [
"https://example.com/updated-faq.pdf",
"https://example.com/new-product-guide.pdf"
]
result = new_docs
- name: data_type
value: STRING
- id: add_to_kb
name: Add to Knowledge Base
tool: JINBA_KNOWLEDGE_BASE_FILE_ADD
forEach: "{{steps.fetch_new_docs.result}}"
config:
- name: token
value: "{{secrets.JINBAFLOW_WS_API_KEY}}"
input:
- name: knowledgeBaseId
value: YOUR_KB_ID_HERE
- name: file
value: "{{item}}"
- name: executionMode
value: "SYNCHRONOUS"
- name: chunkerSettings
value:
chunkSize: 512
chunkOverlap: 128
```
You can [schedule this flow](/en/pages/basics/scheduling) to run daily or weekly.
***
## Alternative Backends
The primary tutorial uses Jinba Knowledge Base, but two additional backends are available for teams with specific requirements.
### When to Choose Each Backend
```mermaid theme={null}
flowchart TD
Start["Which backend
```bash theme={null}
curl -X POST https://api.jinba.dev/api/v2/external/flows/{flow-id}/published-run \
-H "Authorization: Bearer YOUR_API_KEY" \
-H "Content-Type: application/json" \
-d '{
"args": [
{"name": "user_question", "value": "What is your return policy?"}
],
"mode": "sync"
}'
```
**Python example:**
```python theme={null}
import requests
response = requests.post(
"https://api.jinba.dev/api/v2/external/flows/{flow-id}/published-run",
headers={
"Authorization": "Bearer YOUR_API_KEY",
"Content-Type": "application/json"
},
json={
"args": [
{"name": "user_question", "value": "What is your return policy?"}
],
"mode": "sync"
}
)
answer = response.json()
print(answer)
```
See the full [API reference](/en/pages/basics/api) for async mode, error handling, and more.
### Option C: MCP Tool (AI Assistant Integration)
Make your RAG flow available as a tool for AI assistants like Claude Desktop.
Publish your flow with MCP enabled. Navigate to the **MCP** tab in your workspace settings.
Add the Jinba Flow MCP server to your AI assistant's configuration:
```json theme={null}
{
"mcpServers": {
"jinbaflow": {
"command": "npx",
"args": [
"-y",
"supergateway",
"--streamableHttp",
"https://api.jinba.io/api/v2/workspaces/YOUR_WORKSPACE_ID/mcp",
"--header",
"Authorization: Bearer YOUR_TOKEN"
]
}
}
}
```
See the [MCP guide](/en/pages/basics/mcp) for the full setup process.
Your RAG flow now appears as a tool. The AI assistant can invoke it to answer questions using your knowledge base.
***
## Part 4: Advanced Patterns
### Multi-Step RAG with Query Refinement
For complex questions, add a refinement step that improves search results:
```yaml theme={null}
- id: user_question
name: Receive Question
tool: INPUT_TEXT
input:
- name: value
value: ""
- id: initial_search
name: Initial Search
tool: JINBA_VECTOR_SEARCH
config:
- name: token
value: "{{secrets.JINBAFLOW_WS_API_KEY}}"
input:
- name: query
value: "{{steps.user_question.result}}"
- name: knowledgeBaseId
value: YOUR_KB_ID_HERE
- name: topK
value: 10
needs:
- user_question
- id: refine_query
name: Refine Query
tool: OPENAI_INVOKE
config:
- name: version
value: gpt-4o
input:
- name: prompt
value: |
Based on the initial search results, generate a more specific search query.
Original Question: {{steps.user_question.result}}
Initial Results:
{{steps.initial_search.results | dump}}
Generate a refined search query that will find more specific information.
Output ONLY the refined query, nothing else.
needs:
- initial_search
- id: refined_search
name: Refined Search
tool: JINBA_VECTOR_SEARCH
config:
- name: token
value: "{{secrets.JINBAFLOW_WS_API_KEY}}"
input:
- name: query
value: "{{steps.refine_query.result.content}}"
- name: knowledgeBaseId
value: YOUR_KB_ID_HERE
- name: topK
value: 5
- name: threshold
value: 0.4
needs:
- refine_query
- id: final_answer
name: Generate Final Answer
tool: OPENAI_INVOKE
config:
- name: version
value: gpt-4o
input:
- name: prompt
value: |
Answer the user's question using the refined search results.
Question: {{steps.user_question.result}}
Refined Search Results:
{{steps.refined_search.results | dump}}
Provide a detailed, accurate answer with source citations.
needs:
- refined_search
- id: output_answer
name: Output Answer
tool: OUTPUT_TEXT
input:
- name: value
value: "{{steps.final_answer.result.content}}"
needs:
- final_answer
```
### Handling No Results Found
Use [conditional execution](/en/pages/basics/step-options) to handle cases where the knowledge base has no relevant content:
```yaml theme={null}
- id: check_results
name: Check Results
tool: PYTHON_SANDBOX_RUN
input:
- name: code
value: |
results = {{steps.search_knowledge.result}}
has_results = len(results.get('results', [])) > 0
print(has_results)
- name: data_type
value: STRING
needs:
- search_knowledge
- id: generate_answer
name: Generate Answer
tool: OPENAI_INVOKE
config:
- name: version
value: gpt-4o
input:
- name: prompt
value: |
... standard RAG prompt with context ...
needs:
- check_results
when: "'{{steps.check_results.result}}' == 'True'"
- id: no_results_response
name: No Results Response
tool: PYTHON_SANDBOX_RUN
input:
- name: code
value: |
result = "I couldn't find relevant information in the knowledge base to answer your question. Please try rephrasing your question or contact support for assistance."
- name: data_type
value: STRING
needs:
- check_results
when: "'{{steps.check_results.result}}' == 'False'"
```
### Keeping Your Knowledge Base Updated
Create a scheduled flow that automatically updates your knowledge base with new documents:
```yaml theme={null}
- id: fetch_new_docs
name: fetch_new_docs
tool: PYTHON_SANDBOX_RUN
input:
- name: code
value: |
new_docs = [
"https://example.com/updated-faq.pdf",
"https://example.com/new-product-guide.pdf"
]
result = new_docs
- name: data_type
value: STRING
- id: add_to_kb
name: Add to Knowledge Base
tool: JINBA_KNOWLEDGE_BASE_FILE_ADD
forEach: "{{steps.fetch_new_docs.result}}"
config:
- name: token
value: "{{secrets.JINBAFLOW_WS_API_KEY}}"
input:
- name: knowledgeBaseId
value: YOUR_KB_ID_HERE
- name: file
value: "{{item}}"
- name: executionMode
value: "SYNCHRONOUS"
- name: chunkerSettings
value:
chunkSize: 512
chunkOverlap: 128
```
You can [schedule this flow](/en/pages/basics/scheduling) to run daily or weekly.
***
## Alternative Backends
The primary tutorial uses Jinba Knowledge Base, but two additional backends are available for teams with specific requirements.
### When to Choose Each Backend
```mermaid theme={null}
flowchart TD
Start["Which backend
should I use?"] --> Q1{"Enterprise with
Azure ecosystem?"}
Q1 -->|Yes| Azure["☁️ Azure AI Search
Enterprise"]
Q1 -->|No| Q2{"Need metadata
filtering, namespaces,
or reranking?"}
Q2 -->|Yes| Pinecone["🌲 Pinecone"]
Q2 -->|No| Q3{"Want simplest
possible setup?"}
Q3 -->|Yes| Jinba["⚡ Jinba Knowledge Base"]
Q3 -->|No| Pinecone
```
| Feature | Jinba Knowledge Base | Pinecone | Azure AI Search |
| ----------------------- | --------------------------- | ---------------------------- | --------------------------------------- |
| **Setup complexity** | ⭐ Simplest | ⭐⭐ Moderate | ⭐⭐⭐ Advanced |
| **External dependency** | None | Pinecone account | Azure subscription |
| **Document upload** | UI + API | API only | Azure portal / ADLS |
| **Metadata filtering** | ❌ | ✅ Rich filter syntax | ✅ OData filters |
| **Namespace isolation** | ❌ | ✅ | ✅ Indexes |
| **Reranking** | ❌ | ✅ Built-in models | ✅ Semantic ranker |
| **Indexer / pipeline** | Automatic | Manual | ✅ Built-in indexers |
| **Cost** | Included in Jinba plan | Separate Pinecone billing | Azure billing |
| **Best for** | Most use cases, quick start | Advanced search requirements | Enterprise / Azure-native organizations |
### Alternative A: Pinecone
If you need metadata filtering, namespace isolation, or reranking, use [Pinecone](/en/pages/tools/search/pinecone) as your vector backend.
#### Pinecone RAG Manifest
Replace the search step with Pinecone:
```yaml theme={null}
- id: search_pinecone
name: Search Pinecone
tool: PINECONE_QUERY
config:
- name: apiKey
value: "{{secrets.PINECONE_API_KEY}}"
input:
- name: indexName
value: my-knowledge-base
- name: query
value: "{{steps.user_question.result}}"
- name: topK
value: 5
- name: includeMetadata
value: true
- name: rerankModel
value: bge-reranker-v2-m3
- name: rerankTopN
value: 3
needs:
- user_question
```
Then adjust the generation step to use Pinecone's output format:
```yaml theme={null}
- id: generate_answer
name: Generate Answer
tool: OPENAI_INVOKE
config:
- name: version
value: gpt-4o
input:
- name: prompt
value: |
You are a helpful assistant. Answer based on the provided context.
## User Question
{{steps.user_question.result}}
## Relevant Documentation
{{steps.search_pinecone.result.matches | dump}}
Answer accurately based on the documentation above.
needs:
- search_pinecone
```
See the full [Pinecone tool reference](/en/pages/tools/search/pinecone) for index creation and document upsert.
### Alternative B: Azure AI Search (Enterprise)
For enterprise organizations already using the Azure ecosystem, Jinba Flow supports **Azure AI Search** as an external knowledge base backend. This option provides advanced indexing, semantic ranking, and integration with Azure Data Lake Storage Gen2.
Azure AI Search integration is an **enterprise feature**. Contact your Jinba administrator or the Jinba sales team to enable this for your workspace.
#### How It Works
Azure AI Search integration operates differently from the built-in knowledge base:
1. **Documents are stored in Azure** — uploaded to Azure Data Lake Storage Gen2
2. **Indexing is handled by Azure** — Azure AI Search indexers process and index documents
3. **Search queries go through Azure** — either directly or via Azure API Management (APIM)
4. **Results flow back to Jinba Flow** — where the LLM generates answers
```mermaid theme={null}
flowchart LR
Upload["📄 Upload Document"] --> ADLS["Azure Data Lake
Storage Gen2"]
ADLS --> Indexer["Azure AI Search
Indexer"]
Indexer --> Index["Azure AI Search
Index"]
Query["🔍 User Query"] --> Index
Index --> Results["📋 Search Results"]
Results --> LLM["🤖 LLM Generation"]
```
#### Setup Overview
In your workspace settings, navigate to the **External Knowledge Base** configuration. You can connect in two modes:
| Mode | When to Use |
| --------------- | ---------------------------------------------------------------- |
| **APIM Mode** | Routes through Azure API Management — recommended for production |
| **Direct Mode** | Connects directly to Azure AI Search — simpler for development |
Ensure you have:
* An Azure AI Search service with an index configured
* Azure Data Lake Storage Gen2 for document storage
* API keys or APIM subscription keys
* An indexer configured to process uploaded documents
Upload documents through the Jinba workspace UI. Files are automatically sent to Azure Data Lake Storage, and the configured indexer processes them into the search index.
The search step uses the External Knowledge Base configuration from your workspace. The exact tool and parameters depend on your enterprise deployment.
#### Key Configuration Options
| Setting | Description |
| ------------------- | ------------------------------------- |
| **Endpoint URL** | Azure AI Search or APIM endpoint |
| **API Key** | Authentication key |
| **Index API Path** | Path for index operations |
| **Search API Path** | Path for search queries |
| **ADLS API Path** | Path for file storage operations |
| **Indexer Name** | Indexer to trigger after file uploads |
Connection settings can be configured per workspace through the UI, with environment variables as fallbacks.
#### Azure AI Search Advantages
* **Semantic ranking**: Azure's built-in semantic ranker improves result relevance
* **Hybrid search**: Combine vector search with keyword search
* **Built-in indexers**: Automatically extract and index content from various file formats
* **Enterprise compliance**: Data stays within your Azure tenant
* **Azure ecosystem integration**: Works well with other Azure services such as Azure OpenAI
***
## Tuning & Best Practices
### Chunking Configuration
When adding files, tune chunk parameters for your content:
| Content Type | Chunk Size | Overlap | Why |
| ------------------- | ---------- | ------- | ----------------------------- |
| FAQ / Short answers | 256–512 | 64 | Precise, focused retrieval |
| Technical docs | 512–1024 | 128 | Balance precision and context |
| Long-form content | 1024–2048 | 256 | Maintain narrative context |
### Similarity Threshold Guide
| Threshold | Behavior | Use When |
| --------- | ---------------------------------------- | ------------------------------ |
| 0.7–1.0 | Very strict, near-exact matches only | Precise factual lookups |
| 0.4–0.7 | High relevance, closely related | Most Q\&A use cases |
| 0.2–0.4 | Moderate, may include tangential results | Exploratory or broad questions |
| 0.0–0.2 | Very broad, many results | Not recommended for production |
### Prompt Engineering Tips
1. **Be explicit about grounding**: Tell the LLM to answer only from the provided context
2. **Request citations**: Ask the LLM to reference source filenames
3. **Handle uncertainty**: Instruct the LLM to say "I don't know" when context is insufficient
4. **Set the tone**: Add persona instructions for your use case (formal, casual, technical)
***
## What's Next?
Deep dive into knowledge base management, chunking, and RAG patterns
Full parameter reference and advanced search examples
External vector database with filtering and reranking
Complete guide to calling flows via REST API
Connect flows to AI assistants via MCP
Wrap your RAG flow in an agent for enhanced chat