> ## Documentation Index
> Fetch the complete documentation index at: https://docs.jinba.io/llms.txt
> Use this file to discover all available pages before exploring further.
# Agent Builder
> How to create and edit agents
## What is Agent Builder
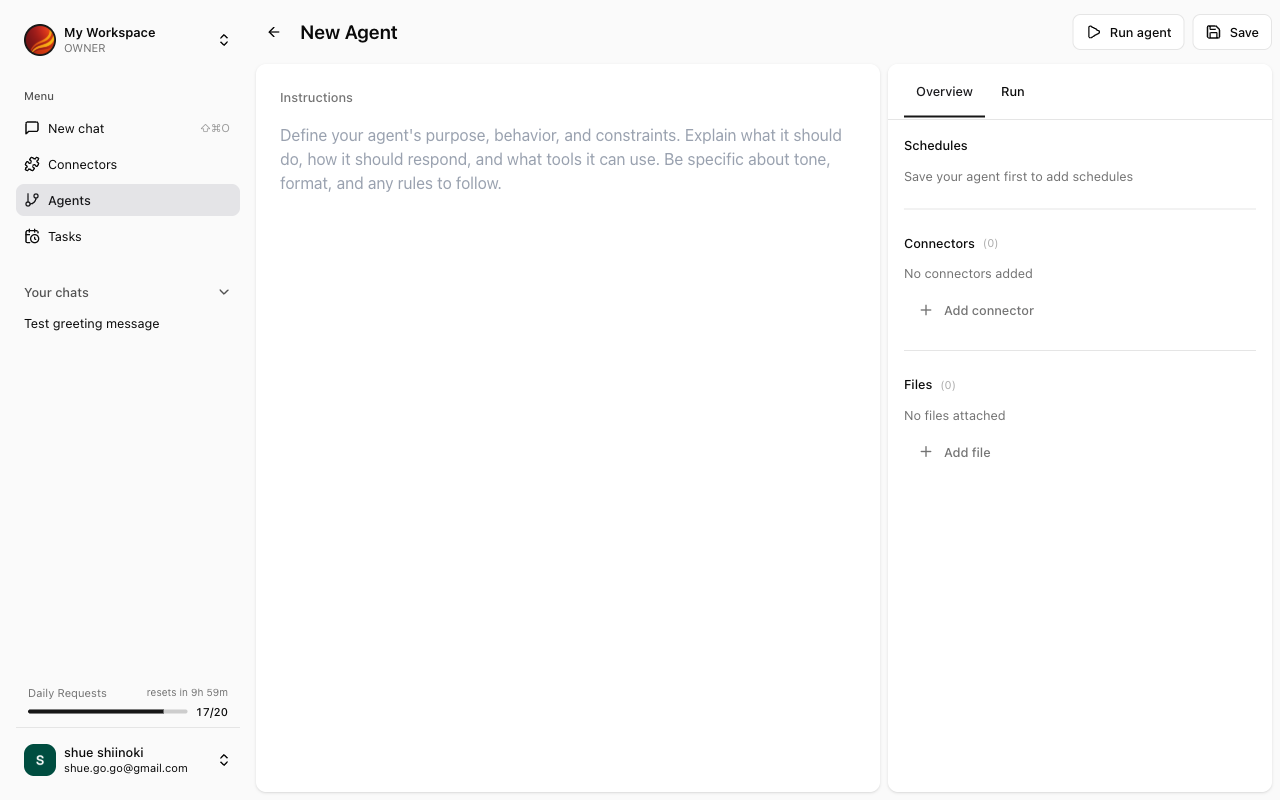
Agent Builder is the screen for creating and editing AI agents. You configure agent settings by giving instructions to the AI in a chat format.
 Creating and editing agents requires workspace owner permissions.
## Opening Agent Builder
### For New Creation
Select "Agents" from the side menu.
Click the "New" button at the top of the screen.
### Editing Existing Agents
Select "Edit" from the settings menu (⋮) of the agent you want to edit.
## Screen Layout
Agent Builder consists of the following areas:
| Area | Description |
| ------------------ | ----------------------------------------------- |
| **Chat Area** | Enter instructions through conversation with AI |
| **Settings Panel** | Display and edit various agent settings |
| **Preview Area** | Preview of the configured results |
## Chat-based Instructions
In Agent Builder, you can give agent configuration instructions to the AI in a chat format.
### Example Instructions
```
This agent retrieves deal data from Salesforce and
creates a weekly sales report.
Please include the following information in the report:
- Number of new deals this week
- Total amount of closed deals
- List of deals requiring follow-up next week
```
The AI analyzes the instructions and suggests appropriate settings.
## Connector Reference Settings
Configure the connectors to be used by the agent.
Click the "Connectors" section in the settings panel.
Check the connectors you want to use with this agent from the available connectors list.
{/* TODO: Screenshot - Connector selection */}
The selected connectors are associated with the agent.
When connectors are configured, the selected connectors become automatically available in chats using this agent.
## File Reference Settings
Configure files for the agent to reference.
Click the "Files" section in the settings panel.
Click the "Add Files" button and upload the files you want the agent to reference.
{/* TODO: Screenshot - File upload */}
Uploaded files are displayed in the list.
### Reference File Examples
* **FAQ Documents**: Information that forms the basis for customer support agent responses
* **Report Templates**: Sample output formats
* **Business Manuals**: Procedure and policy references
## Saving Agents
After completing the settings, save the agent.
Enter a name for the agent (if not already entered).
Enter a description for the agent. A clear description is recommended as it will be displayed in the list.
Click the "Save" button at the top of the screen to save.
## Running Agents (Testing)
You can test run the agent before or after saving.
Click the "Run" button in Agent Builder.
A chat screen with the agent's settings applied opens. You can send actual questions to verify the behavior.
If there are no issues with the test run, save the agent and proceed with publishing preparations.
## Troubleshooting
* Try describing the instructions more specifically
* Enter in a format that's easier for the AI to understand
* Verify the connector is installed
* Check the connector's connection status
* Verify the file format is supported
* Check if the file size exceeds the limit
Creating and editing agents requires workspace owner permissions.
## Opening Agent Builder
### For New Creation
Select "Agents" from the side menu.
Click the "New" button at the top of the screen.
### Editing Existing Agents
Select "Edit" from the settings menu (⋮) of the agent you want to edit.
## Screen Layout
Agent Builder consists of the following areas:
| Area | Description |
| ------------------ | ----------------------------------------------- |
| **Chat Area** | Enter instructions through conversation with AI |
| **Settings Panel** | Display and edit various agent settings |
| **Preview Area** | Preview of the configured results |
## Chat-based Instructions
In Agent Builder, you can give agent configuration instructions to the AI in a chat format.
### Example Instructions
```
This agent retrieves deal data from Salesforce and
creates a weekly sales report.
Please include the following information in the report:
- Number of new deals this week
- Total amount of closed deals
- List of deals requiring follow-up next week
```
The AI analyzes the instructions and suggests appropriate settings.
## Connector Reference Settings
Configure the connectors to be used by the agent.
Click the "Connectors" section in the settings panel.
Check the connectors you want to use with this agent from the available connectors list.
{/* TODO: Screenshot - Connector selection */}
The selected connectors are associated with the agent.
When connectors are configured, the selected connectors become automatically available in chats using this agent.
## File Reference Settings
Configure files for the agent to reference.
Click the "Files" section in the settings panel.
Click the "Add Files" button and upload the files you want the agent to reference.
{/* TODO: Screenshot - File upload */}
Uploaded files are displayed in the list.
### Reference File Examples
* **FAQ Documents**: Information that forms the basis for customer support agent responses
* **Report Templates**: Sample output formats
* **Business Manuals**: Procedure and policy references
## Saving Agents
After completing the settings, save the agent.
Enter a name for the agent (if not already entered).
Enter a description for the agent. A clear description is recommended as it will be displayed in the list.
Click the "Save" button at the top of the screen to save.
## Running Agents (Testing)
You can test run the agent before or after saving.
Click the "Run" button in Agent Builder.
A chat screen with the agent's settings applied opens. You can send actual questions to verify the behavior.
If there are no issues with the test run, save the agent and proceed with publishing preparations.
## Troubleshooting
* Try describing the instructions more specifically
* Enter in a format that's easier for the AI to understand
* Verify the connector is installed
* Check the connector's connection status
* Verify the file format is supported
* Check if the file size exceeds the limit